1: подготовка клиента ipa
Сначала нужно подготовить клиентскую машину к запуску FreeIPA: указать имя хоста сервера, обновить системные пакеты и проверить записи DNS.
Имя хоста клиента должно совпадать с FQDN клиента FreeIPA.
2: настройка dns
Все машины, на которых работает FreeIPA, должны использовать полные доменные имена (FQDN) как имена хостов. Кроме того, имя хоста каждого сервера должно разрешаться по его IP-адресу, а не по localhost.
Примечание: Если вы настраиваете сервер FreeIPA в локальной сети, используйте внутренние IP-адреса.
Внешний IP-адрес сервера можно найти в его панели управления или с помощью команды ip:
ip addr show. . .2: eth0: <BROADCAST,MULTICAST,UP,LOWER_UP> mtu 1500 qdisc pfifo_fast state UP group default qlen 1000link/ether 00:00:00:00:00:00 brd ff:ff:ff:ff:ff:ffinet 111.111.111.111/18 brd 111.111.111.255 scope global eth0valid_lft forever preferred_lft foreverinet6 1111:1111:1111:1111::1111:1111/64 scope globalvalid_lft forever preferred_lft forever. . .
Адрес IPv4 указан в строке inet. Если вы используете IPv6, его можно найти в inet6. Если вы настроили частную сеть, также в выводе вы увидите дополнительные внутренние IP-адреса (их можно проигнорировать). Отличить внешний IP-адрес от внутреннего можно по диапазону: внутренние адреса IPv4 будут в диапазонах 192.168.*.*, 10.*.*.*, или с 172.16.*.* до 172.31.*.*. Внутренние адреса IPv6 всегда начинаются с префикса fe80::.
Теперь нужно отредактировать файл hosts и направить имя хоста сервера на внешний IP-адрес. Файл /etc/hosts связывает доменные имена с IP-адресами локально, на компьютере. Откройте этот файл с помощью nano или другого текстового редактора.
nano /etc/hosts
Найдите строку, в которой после 127.0.0.1 указано имя хоста:
3: аутентификация
Откройте веб-интерфейс IPA:
3: установка генератора случайных чисел
Для поддержки шифрования FreeIPA потребуется много случайных данных. Виртуальная машина очень быстро израсходует случайные данные или энтропию. Чтобы избежать этого, используйте rngd, генератор случайных чисел. Rngd берёт данные с аппаратных устройств, подключенных к серверу, и передаёт их в генератор случайных чисел ядра.
Установите пакет:
yum install rng-tools
Запустите его:
systemctl start rngd
Включите сервис, чтобы генератор запускался вместе с сервером:
systemctl enable rngd
Убедитесь, что rngd запущен:
systemctl status rngd
В выводе должна быть строка:
active (running)
Итак, все зависимости установлены. Теперь можно установить программное обеспечение FreeIPA.
4: установка сервера freeipa
Установите пакет FreeIPA с помощью команды:
yum install ipa-server
Запустите установку FreeIPA. Следующая команда запустит сценарий, который запросит у вас некоторые данные и установит FreeIPA.
ipa-server-install
Помимо аутентификации, FreeIPA может управлять DNS-записями для хостов. Это может облегчить настройку и управление хостами. Но в базовой настройке эта функция не нужна, поэтому выберите no.
Do you want to configure integrated DNS (BIND)? [no]: no
Далее нужно указать имя хоста сервера, доменное имя и пространство Kerberos. Kerberos – это протокол аутентификации, который использует FreeIPA. Настоятельно рекомендуется в качестве пространства Kerberos использовать доменное имя сервера. При использовании другой схемы именования могут возникнуть проблемы с интеграцией в Active Directory FreeIPA и другие конфликты.
5: тестирование сервера freeipa
Для начала убедитесь, что пространство Kerberos установлено правильно. Для этого попробуйте инициализировать токен Kerberos для администратора.
6: настройка пользователей ipa
FreeIPA имеет очень обширный набор функций управления пользователями и политикой. Подобно стандартным пользователям Unix, пользователи FreeIPA могут принадлежать к группам. На основе политики группам или отдельным пользователям может быть разрешен или запрещен доступ к хостам (клиентским машинам) или группам хостов.
Попробуйте добавить новых пользователей.
Adding services
IPA clients are added to the directory by enrolling them. Operating systems that do not have the ipa-client-install program (like OS X), will need to follow the steps in the #Configuring IPA Clients section to enroll properly.
Configuring a fedora/red hat enterprise linux/centos client
If the client system has not yet been enrolled with IPA, do that first. Once that is done, simply edit /etc/sysconfig/nfs and set:
SECURE_NFS="yes"
Then start the appropriate services:
# service rpcgssd start
# service rpcbind start
# service rpcidmapd start
Then, to see what exports are available from the NFS server:
Configuring a fedora/red hat enterprise linux/centos server
If the server in question is running Fedora, Red Hat Enterprise Linux, or CentOS (and similar operating systems, edit /etc/sysconfig/nfs and set:
SECURE_NFS="yes"
Create the /etc/exports file to contain:
Configuring ipa clients
How you configure the IPA clients depends on the client operating system.
Configuring the ipa server
The next step is to start the server configuration process. The ipa-server-install program is used to set everything up. It’s interactive, but essentially it configures a stand-alone CA (dogtag) for certificate management, configures ntpd which is important for Kerberos, configures the directory server (which uses the 389 Directory Server rather than OpenLDAP), configures the KDC, and also configures Apache.
The things you will need to know pre-install:
That is all you need to begin with. Below is a transcript of the entire process:
Directory utility setup
This one is a bit of a bear to get right. The FreeIPA documentation on OS X Client Configuration is out-dated (written for OS X 10.4), and the Fedora documentation has absolutely nothing about OS X clients.
As we’ve already seen, setting up OS X is a pretty manual affair and getting the LDAP lookups to work correctly is no different.
To begin, launch Directory Utility. On the Services pane will be three service names: Active Directory, LDAPv3, and NIS. After authenticating (click the padlock), click the “LDAPv3” line to highlight it, then click the little pencil icon to edit.
Click the “New…” button and enter the IPA server name in the “Server Name or IP Address” field. Make sure that “Encrypt using SSL” is unchecked, as well as the “Use for contacts” (you could, optionally, use the LDAP directory for contact information but the point of this particular exercise is for authentication, so at this point turn it off).
You should be back at the option list. Enter “IPA LDAP” for the configuration name, and select “Custom” for the LDAP Mappings. Make sure the SSL checkbox is not checked. Now highlight the new entry and click the “Edit…” button.
Under the “Connection” tab, change a few of the defaults:
- Open/close times out in 10 seconds
- Query times out in 10 seconds
- Connection idles out in 1 minutes
Unfortunately, at least in OS X 10.8, you cannot change the re-bind attempts timeout from the default of 120 seconds; you can change it in OS X 10.7, so if using that version set it to 10s as well. Also ensure that SSL encryption and the custom port are unchecked.
Fedora
On Fedora 17 and presumably all other Fedora versions with freeipa-ciient available, the setup is quite the same. The primary difference is that the package is called freeipa-client rather than ipa-client:
# yum install freeipa-client
# ipa-client-install --hostname=fedora.linsec.ca
...
Firefox
For the Firefox web browser, if you set network.negotiate-auth.trusted-uris to the domain, as per the documentation, it will work — on Linux. On OS X it does not; you must also tell Firefox to allow for delegation. This means you will also need to set network.negotiate-auth.using-native-gsslib and network.negotiate-auth.delegation-uris, so it will look like:
network.negotiate-auth.delegation-uris: .linsec.ca
network.negotiate-auth.gsslib: true
network.negotiate-auth.trusted-uris: .linsec.ca
These can be set in the about:config settings of the browser.
Google chrome / chromium
Note: prior to Chrome 101; the Allowlist noted below was Whitelist.
Out of the box, Google Chrome must be told about any kerberos authentication and unfortunately it isn’t exposed via the settings in the browser. You will need to add some command-line options to Chrome (or Chromium) in order for this to work. Using –auth-server-allowlist will work for most kerberos-enabled sites, however it will not properly authenticate against the IPA web service itself because it does not perform delegation.
Individual tasks
Manage IdP references in IPA
Implement a method to manage IdP references in IPA. It can be done similarly to
how RADIUS proxy links are managed but with more complex data structures
specific for OAuth2.
Topic commands:
For more details about IPA API and Web UI implementation please refer to
idp-api.
Ipa enrollment
Because we cannot enroll the system into IPA the easy way, we need to visit the web UI and add a new host. In the IPA web UI, go the Identity and then the Hosts page. Click the “Add” button, where you will need to add the fully qualified domain name of the host (e.g. mac.linsec.ca), and then click the “Add and Edit” button.
You don’t need to add much here, other than the MAC address of the system, and the SSH public keys, which can be found in /etc/ssh_host_dsa_key.pub and /etc/ssh_host_rsa_key.pub. The Ethernet MAC address can be found via either ifconfig or System Preferences.
This, unfortunately, does not generate a keytab file for the host, so on the server, using the ipa-getkeytab program, we will create an obtain the keytab for our new host:
# ipa-getkeytab -s ipa.linsec.ca -p host/mac.linsec.ca -k ~/mac.keytab
Keytab successfully retrieved and stored in: ~/mac.keytab
# ipa host-show mac
  Host name: mac.linsec.ca
  Principal name: host/[email protected]
  MAC address: 00:00:00:AA:1B:14
  SSH public key fingerprint: AF:A6:75:4C:7B:7B:C5:20:8E:C6:81:60:CC:4C:1C:25 (ssh-dss),
    30:19:4E:F5:34:CB:0B:76:24:0E:D0:F9:A3:7D:5E:E2 (ssh-rsa)
  Password: False
  Keytab: True
  Managed by: mac.linsec.ca
The key here is we want to use host/[FQDN] as the kerberos principal.
Incidentally, you can add the host from the command line using ipa host-add as well, but with the web UI you can cut and paste the SSH pubkeys.
Kerberos setup
First, you need to enable Kerberos support, which is done by editing /Library/Preferences/edu.mit.Kerberos, and it should look like:
[domain_realm]
    .linsec.ca = LINSEC.CA
    linsec.ca = LINSEC.CA

[libdefaults]
    default_realm = LINSEC.CA
    allow_weak_crypto = yes
    dns_lookup_realm = true
    dns_lookup_kdc = true
    rdns = false
    ticket_lifetime = 24h
    forwardable = yes
    renewable = true

[realms]
    LINSEC.CA = {
        pkinit_anchors = FILE:/etc/ipa/ca.crt
    }
Next, you need to download the ca.crt from the IPA server:
Mac os x 10.7/10.8
Unlike with Fedora or Red Hat Enterprise Linux (and variants), there is no ipa-client-install tool written for OS X, so the process is quite manual and very similar to that outlined in Using Kerberos for Single Sign-On Authentication, except that we will attempt to configure OS X to handle everything that a Linux client would, not just Kerberos.
Manage idp references in ipa
Implement a method to manage IdP references in IPA. It can be done similarly to
how RADIUS proxy links are managed but with more complex data structures
specific for OAuth2.
Topic commands:
For more details about IPA API and Web UI implementation please refer to
idp-api.
Network changes
You must also change the network configuration. By default, NetworkManager may be managing the network interfaces. You do not want this! You need to change the networking to not use NetworkManager (and use the regular network service). This can done via:
# chkconfig NetworkManager off; service NetworkManager stop
# chkconfig network on; service network start
Before doing this, you may need to modify /etc/sysconfig/network-scripts/ifcfg-eth0 and change:
NM_CONTROLLED="yes"
to:
NM_CONTROLLED="no"
Finally, edit /etc/hosts and ensure that the IPA server address is listed. This is required for Apache to work properly:
127.0.0.1   localhost localhost.localdomain localhost4 localhost4.localdomain4
::1         localhost localhost.localdomain localhost6 localhost6.localdomain6
192.168.0.10 ipa.linsec.ca ipa
Oauth 2.0 access token exchange
Another method to authorize and verify resource owner identity is to exchange
already existing OAuth 2.0 access token obtained by a different OAuth 2.0
client. This is most useful if the latter client is capable to initiate OAuth
2.0 authorization flow using a web browser.
For the initial implementation of the OAuth 2.0 authorization in FreeIPA, we
would skip this method.
Oauth 2.0 proxy app
Adding a stable ipa-idp.$DOMAIN stable URI would need to be complemented by a
web application that would respond at that URI. This application would
essentially need to implement a specialized OAuth 2.0 proxy flow to allow a web
application in IPA domain to initiate OAuth 2.0-based login on behalf of that
application.
Post-installation configuration
If you have not configured BIND already, notice that during the installation ipa-server-install spit out this notice:
Sample zone file for bind has been created in /tmp/sample.zone.QBsBwU.db
The contents of this file contain:
$ORIGIN linsec.ca.
$TTL    86400
@           IN SOA  linsec.ca. hostmaster.linsec.ca. (
                01      ; serial
                3H      ; refresh
                15M     ; retry
                1W      ; expiry
                1D )        ; minimum

                IN NS           ipa.linsec.ca.
ipa.linsec.ca.      IN A            192.168.250.10
;
; ldap servers
_ldap._tcp      IN SRV 0 100 389    ipa

;kerberos realm
_kerberos       IN TXT LINSEC.CA

; kerberos servers
_kerberos._tcp      IN SRV 0 100 88     ipa
_kerberos._udp      IN SRV 0 100 88     ipa
_kerberos-master._tcp   IN SRV 0 100 88     ipa
_kerberos-master._udp   IN SRV 0 100 88     ipa
_kpasswd._tcp       IN SRV 0 100 464    ipa
_kpasswd._udp       IN SRV 0 100 464    ipa

;ntp server
_ntp._udp       IN SRV 0 100 123    ipa
If you’re not running BIND already, it’s sufficient to use this file alone. If you already have a BIND server setup, you will need to include these LDAP/Kerberos/NTP-related lines in your existing zone file.
Essentially, these are the records that define the services provided by the IPA server so that they can be found via DNS. All the service (SRV) records include the service name (_kerberos) and protocol (tcp) as well as the port (so port 389 for LDAP, 88 for Kerberos, etc.) and then the host that answers (ipa, in this case).
Next, test that you can obtain a Kerberos ticket:
Pre-requisites
This install is done on CentOS 6.3 with IPA 2.2.0 (which is what comes with CentOS 6). The first thing that needs to be done is for the IPA server to be installed on the system that you intend to have as the IPA master:
# yum install ipa-server
This will result in quite a lot of packages being installed, if you did not elect to install the IPA server during the initial system install.
Red hat enterprise linux / centos
These instructions work for Red Hat Enterprise Linux 5, 6, and 7 (and the equivalent versions of CentOS).
The first thing you need to do is install the ipa-client package:
# yum install ipa-client
Then you need to run the ipa-client-install program:
References
- 05/16/2022 – update Chrome’s kerberos key names
- 12/04/2022 – using ‘defaults write’ is easier than editing plist files on OS X
- 06/23/2022 – permanent configuration files in Chrome/Chromium
- 05/30/2022 – add information on how to properly setup Chrome and Firefox
- 12/18/2022 – setting up a kerberized netatalk server on linux
- 12/15/2022 – add information on nfs client/server setup for linux
- 12/13/2022 – add information on group lookups on OS X, note how to obtain kerberos ticket at login on OS X
- 12/11/2022 – Initial article
Safari
At this time, at least with Safari 6.0.4, it does not look like it supports delegation. So while Safari may work transparently with some kerberos-authenticated sites, for any sites that require delegation, Safari will not work (this includes the IPA web interface).
Setting up kerberized nfsv4 server
Setting up file sharing with NFSv4 is quite straightforward. On the IPA server, you need to create a service entry and generate a keytab for the NFSv4 server:
Sso на freeipa apache flask-login jwt
Всем привет.
В статье описывается разработка и развёртывание системы SSO-аутентификации, использующей Kerberos и JWT. Модуль аутентификации разработан с применением Flask, Flask-Login и PyJWT. Развёртывание выполнено с использованием веб-сервера Apache, сервера идентификации FreeIPA и модуля mod_lookup_identity на CentOS 6/7. В статье много текста, средне кода и мало картинок. В общем, будет интересно.

Немного расскажу про SSO. Single Sign-On (SSO) — принцип аутентификации, позволяющий пользователю ввести пароль только один раз при начале работы с системой и после этого обеспечивающий пользователю беспарольный вход во все приложения домена. На практике 100% SSO встречается очень редко, ибо в организациях часто бывают legacy-системы, которые просто не знают такой аббревиатуры либо не поддерживают современные методы. К возможным методам SSO относятся протокол Kerberos, сертификаты SSL и прочее. Собственно задача аутентификации/проверки токена может возлагаться как на каждое приложение, так и на какой-то центральный сервер аутентификации. Обычно внедрение SSO подразумевает наличие центральной базы данных пользовательских аккаунтов и некое ПО для управления этой базой.
Для Windows-окружения есть стандартное решение, обеспечивающее как SSO, так и централизованную БД пользователей — Active Directory. В linux-мире всё не так однозначно. Был и успешно сдох NIS (но не до конца), есть некоторое количество «стандартных» решений на LDAP, многие (и я тоже) делали какие-то свои надстройки и веб-интерфейсы над OpenLDAP, пытались использовать winbind для связи с AD и так далее. На мой скромный взгляд Red Hat дальше всех ушла в вопросе стандартного «контроллера домена» для Linux, купив и допилив FreeIPA. Продукт разворачивается одной командой, прекрасно работает в RHEL/OEL/CentOS/Fedora-среде (докладывают, что и для Debian есть клиентский модуль), обеспечивает кросс-доменную аутентификацию в AD, управляется целиком через веб-интерфейс, централизует настройки DNS, automount, sudo… Короче, он у меня есть и я с ним счастливо живу.
Тут хочу повториться, что софт я писать не особо умею и не очень люблю, но иногда приходится. И вот писал я убийцу Google Forms, и, естественно, встала задача аутентифицировать пользователя, кою я успешно решил, возложив задачу проверки kerberos-тикета на Apache и запрашивая после этого данные из LDAP (из FreeIPA) для uid из переменной REMOTE_USER. В дальнейшем, применив mod_lookup_identity, смог даже отказаться от работы с LDAP. Но было в этом решении одно слабое место — пользователи windows и я, заходящие с устройств, не управляемых FreeIPA и, соответственно не имеющие kerberos-тикета (строго говоря, win-пользователи могли бы иметь тикет через изврат с cmd либо через развёртывание AD и cross-domain trust, но ни тем, ни другим извращением заниматься не хотелось).
Давным давно прочитал я про JSON Web Tokens и всегда чесались руки их попробовать. Вот и представилась возможность. Я порешил сделать так: те, кто имеют krb-тикет, пусть аутентифицируются через Kerberos, а те бедняги, у кого тикета нет, пусть вводят логин-пароль и попадают на Basic-аутентификацию. Тем более, что для Basic Auth есть mod_authnz_pam, позволяющий вообще забыть про проверку паролей руками. Результат аутентификации будет записываться в cookie в виде JWT, а приложение, запросившее аутентификацию, будет получать эти данные из токена. Соответственно, оформилась потребность в центральном сервисе аутентификации, выдающем JWT.
Для разработки использовались Python и Flask (так как это единственное, на чём я могу разрабатывать более-менее законченные приложения). Для управления аутентификацией в Flask был взят Flask-Login, для работы с jwt — PyJWT. Ссылка на исходники, если кому нужна, будет в конце.
С подачи моей жены сервис аутентификации был назван Hogwarts’ Hat (hh) — та шляпа тоже всё про всех знала.
Для hh был создан свой virtualenv, код был скопирован в корень этого virtualenv, запускается приложение на mod_wsgi. Ниже конфиг апача:
Логика такова:
- На первый запрос пользователя сервер отвечает 401 и просит Negotiate-аутентификацию
- Пользователь предоставляет krb-тикет
- Сервер запрашивает у sssd информацию о пользователе, устанавливает переменные окружения и передаёт запрос в wsgi-приложение
либо:
- На первый запрос пользователя сервер отвечает 401 и просит Negotiate-аутентификацию
- Пользователь не предоставляет krb-тикет
- Сервер отвечает 401 и просит Basic Auth
- Пользователь вводит логин-пароль и успешно аутентифицируется
- Сервер запрашивает у sssd информацию о пользователе, устанавливает переменные окружения и передаёт запрос в wsgi-приложение
В любом другом случае пользователь получает 401 от сервера, что не очень красиво, но зато легко реализовать. Альтернативой мог бы стать
mod_intercept_form_submit
, но не хотелось возиться с формами.
wsgi-файл сервиса выглядит так:
__init__.py для пакета app тривиален, поэтому рассматривать его здесь не буду. А вот views.py интереснее — там Flask-Login помогает облегчить работу с данными пользователя:
Основная идея — свой request_loader, который создаёт объект типа HTTPDPoweredUser из переменных окружения, установленных апачем. В дальнейшем в любой функции, завёрнутой в декоратор login_required, можно получить доступ к информации и пользователе через переменную current_user.
Сервис написан таким образом, что при заходе в / аутентифицированному пользователю выдаётся свежий jwt-кукис следующим образом:
Как видно, в токен помимо uid записываются также и ФИО пользователя, и его группы, что избавляет другие приложения от необходимости лазить в центральную БД за инфой о пользователях.
Также у сервиса есть страничка /status, где можно посмотреть на состояние своего jwt:
@app.route('/status', methods=['GET'])
@login_required
def status():
    auth_cookie = request.cookies.get(app.config.get('JWT_COOKIE_NAME'))
    logging.debug('cookie: %s' % str(auth_cookie))
    tokens = {}
    error_message = ''
    if auth_cookie is not None:
        try:
            tokens = jwt.decode(
                auth_cookie,
                app.config.get('JWT_PUBLIC_KEY'),
                audience=app.config.get('JWT_URN')   'all',
                issuer=app.config.get('JWT_ISSUER_NAME')
            )
            nbf = datetime.utcfromtimestamp(tokens.get('nbf'))
            tokens['nbf'] = '('   str(nbf)   ') '   str(tokens.get('nbf'))
            exp = datetime.utcfromtimestamp(tokens.get('exp'))
            tokens['exp'] = '('   str(exp)   ') '   str(tokens.get('exp'))
            logging.debug('cookie decoded successfully')
        except jwt.DecodeError:
            logging.debug('status: jwt.DecodeError')
            error_message = 'Failed to decode provided JWT'
        except jwt.ExpiredSignatureError:
            logging.debug('status: jwt.ExpiredSignatureError')
            error_message = 'JWT is expired'
        except jwt.InvalidIssuerError:
            logging.debug('status: jwt.InvalidIssuerError')
            error_message = 'JWT is issued by a wrong issuer'
        except jwt.InvalidAudienceError:
            logging.debug('status: jwt.InvalidAudienceError')
            error_message = 'JWT is issued for another audience'
    else:
        error_message = 'No JWT cookie received'
    logging.debug('tokens: %s' % str(tokens))
    attr_error = False if current_user is not None else True
    return render_template(
        'status.html',
        error=False if error_message == '' else True,
        error_message=error_message,
        tokens=tokens,
        attr_error=attr_error,
        user=current_user
    )
Ключи я генерировал так:
openssl ecparam -genkey -name secp521r1 -noout -out hogwartshat_key.pem # p521 - не опечатка
openssl ec -in hogwartshat_key.pem -pubout -out hogwartshat_pub.pem
Потом просто скопировал содержимое pem-файлов в конфиг. Обратите внимание, что PyJWT для работы с асимметричными ключами и эллиптическими кривыми требует модуля cryptography. Радиуса кривизны моих рук не хватило, чтобы запустить PyJWT с предложенными в документации альтернативными модулями.
Ну и, собственно, кусок кода, отвечающий за аутентификацию для сторонних приложений:
@app.route('/return_to', methods=['GET'])
@login_required
def return_to():
    app_id = request.args.get('appid')
    data = request.args.get('data')
    if app_id is None:
        return make_error_page('No application ID provided', str(request.url)), 400
    elif app_id not in app.config.get('APPS_PUBLIC_KEYS').keys():
        return make_error_page('Unknown application ID provided', str(request.url)), 403
    if data is None:
        return make_error_page('Application provided empty request', str(request.url)), 400
    else:
        try:
            tokens = jwt.decode(
                data,
                app.config.get('APPS_PUBLIC_KEYS')[app_id],
                audience=app.config.get('JWT_ISSUER_NAME'),
                issuer=app.config.get('JWT_URN')   app_id
            )
            return_url = tokens.get('return_url')
            if current_user is not None:
                cookie = current_user.get_auth_token()
                expire_date = datetime.utcnow()   timedelta(hours=app.config.get('JWT_EXPIRE_TIME_HOURS'))
                response = make_response(redirect(str(return_url), code=301))
                response.set_cookie(
                    app.config.get('JWT_COOKIE_NAME'),
                    value=cookie,
                    expires=expire_date,
                    domain=app.config.get('JWT_COOKIE_DOMAIN'),
                    path=app.config.get('JWT_COOKIE_PATH'),
                    secure=app.config.get('SESSION_COOKIE_SECURE')
                )
                logging.debug('jwt response: %s' % str(response))
                return response
        except jwt.DecodeError:
            return make_error_page('Failed to decode provided JWT', str(request.url)), 412
        except jwt.ExpiredSignatureError:
            return make_error_page('JWT is expired', str(request.url)), 412
        except jwt.InvalidIssuerError:
            return make_error_page('JWT is issued by a wrong issuer', str(request.url)), 412
        except jwt.InvalidAudienceError:
            return make_error_page('JWT is issued for another audience', str(request.url)), 412
    return str(request.args)
Немножко скриншотов. Главная страница:
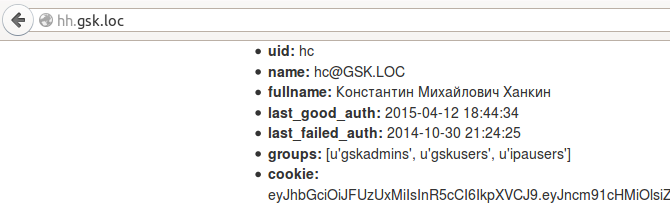
Печенька свежая, в чём можно убедиться на странице /status:
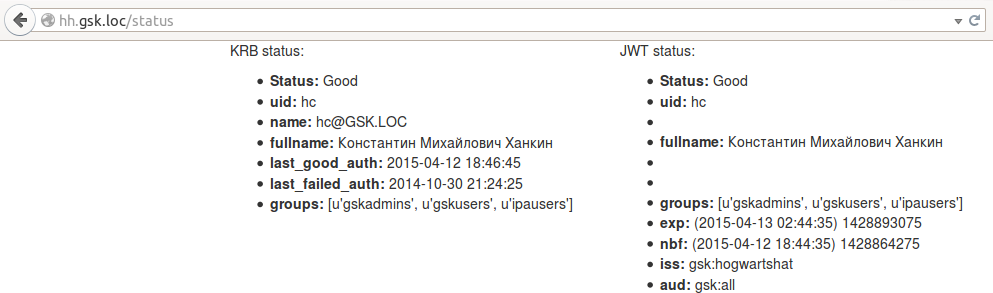
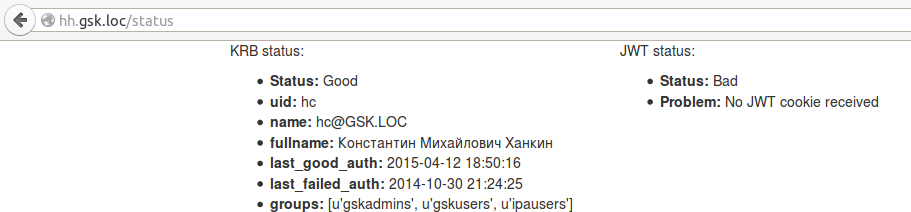
last_good_auth из krb-переменных обновился, так как любой переход между страницами вызывает аутентификацию пользователя через krb-тикет. В jwt параметры exp и nbf не обновились, потому как куку никто и не обновлял. А вот что будет, если кукис удалить:
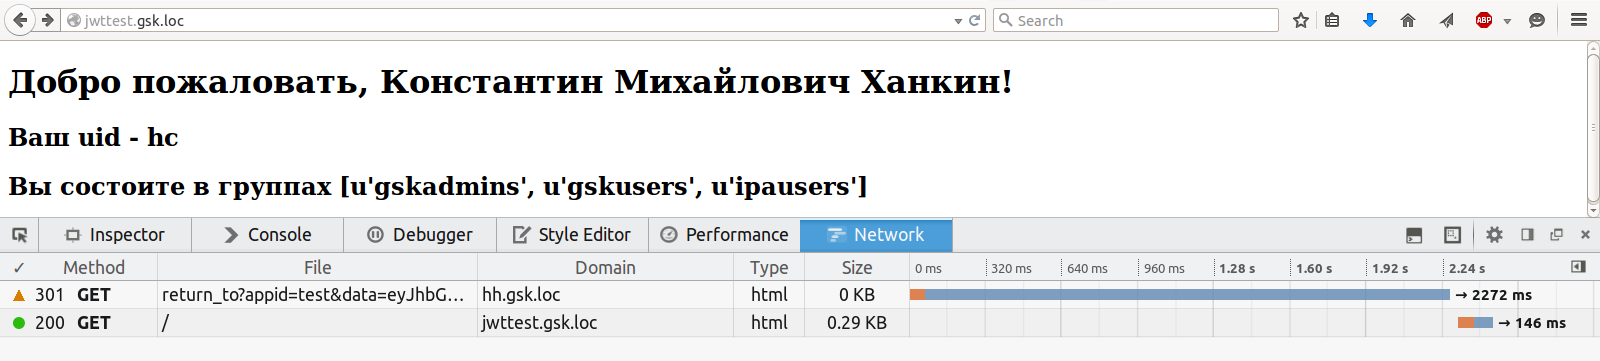
Ну и самое интересное — аутентификация в стороннем приложении. Для демонстрации было написано маленькое и уродливое приложение, которое умеет прочитать кукис и показать либо страницу с данными из JWT, либо страницу с ошибкой. Оно настолько маленькое и настолько уродливое, что я просто весь код выложу сюда:
import jwt
import logging.config
from datetime import datetime, timedelta

from flask import Flask, redirect, render_template, get_flashed_messages
from flask_login import LoginManager, UserMixin, login_required, current_user

app = Flask(__name__)
app.config['SECRET_KEY'] = 'the session is unavailable because no secret key was set.'

login_manager = LoginManager()
login_manager.init_app(app)

key = '''-----BEGIN EC PRIVATE KEY-----
-----END EC PRIVATE KEY-----'''

hh_pubkey = '''-----BEGIN PUBLIC KEY-----
-----END PUBLIC KEY-----'''

logging.config.fileConfig('logging.conf')


class JWTPoweredUser(UserMixin):
    def __init__(self, fullname, uid, groups):
        for attr in [fullname, uid, groups]:
            if attr is None:
                raise AttributeError('%s cannot be None' % attr.__name__)
        self.fullname = fullname
        self.uid = uid
        self.groups = groups

    def is_anonymous(self):
        return False

    def is_active(self):
        return True

    def is_authenticated(self):
        return True

    def get_id(self):
        return unicode(self.uid)


@login_manager.request_loader
def load_user_from_request(req):
    cookie = req.cookies.get('gsk_auth')
    if cookie is None:
        login_manager.login_message = 'no cookie'
        return None
    try:
        tokens = jwt.decode(cookie, hh_pubkey, issuer='gsk:hogwartshat', audience='gsk:all')
    except jwt.ExpiredSignatureError:
        login_manager.login_message = 'expired'
        return None
    except jwt.DecodeError:
        login_manager.login_message = 'decode error'
        return None
    except jwt.InvalidIssuerError:
        login_manager.login_message = 'invalid issuer'
        return None
    except jwt.InvalidAudienceError:
        login_manager.login_message = 'invalid audience'
        return None
    return JWTPoweredUser(tokens.get('fullname'), tokens.get('uid'), tokens.get('groups'))


@login_manager.unauthorized_handler
def unauthorized():
    data = jwt.encode({
        'iss': 'gsk:test',
        'aud': 'gsk:hogwartshat',
        'nbf': datetime.utcnow(),
        'exp': datetime.utcnow()   timedelta(minutes=1),
        'return_url': 'http://jwttest.gsk.loc'
    }, key, algorithm='ES512')
    logging.debug('jwt request: %s' % data)
    url = 'http://hh.gsk.loc/return_to?appid=test&data=%s' % data
    logging.debug('jwt return_to: %s' % url)
    page = render_template(
        'error.html',
        error=login_manager.login_message,
        url=url
    )
    logging.debug('jwt page: %s' % page)
    return page, 403


@app.route('/', methods=['GET'])
@login_required
def index():
    return render_template('index.html', user=current_user)
Суть та же — кастомный request_loader проверяет токен, а если с ним что-то не так — возвращает None, что заставляет Flask-Login выполнить unauthorized_handler, который тоже кастомный.
Демо без cookie:

После похода за печеньками:
Естественно, никто не запрещает редирект сделать автоматическим, вместо показа 403. Более того, демо-приложение изначально так и было написано, но затем для наглядности была прикручена страница с картинками.
Можно ещё поиздеваться над аутентификатором, подставляя ему в параметр запроса data всякий мусор, в том числе устаревшие и/или имеющие некорректные парамеры iss/aud токены — он всё успешно жуёт и ругается. Остаётся последняя нерешённая проблема — как сообщить желающему аутентификации приложению об ошибке? На данный момент рабочая мысль — передавать в запросе URL-callback, на который будет отправлен отчёт об ошибке. Мысль пока единственная, поэтому реализовывать не тороплюсь.
Вторая нерешённая проблема — это selinux. Так как модуль cryptography использует нативные библиотеки, их надо все пометить типом lib_t. Видимо, не все ещё нашёл, так что пока что просто отключил selinux. Добавляю определения типов для файлов через semanage fcontext -a -t <тип> ‘<regex-путь>’.
Если кого-то заинтересовал полный исходный код, скачать можно здесь. Лицензия — делайте что хотите; если код вам пригодится — то и хорошо.
Ругайте.
Создание аккаунта для доступа к ldap
Некоторые сервисы использующие LDAP требуют предварительно настроенной учетной записи. Использование обычной учетной записи пользователя предпочтительней, но не всегда это целесообразно делать. Можно сделать системную учетную запись следующим образом на сервере FreeIPA используя пароль Directory :
Создание доверительных отношений с ms activedirectory
Вводные данные:
Настраиваем доверительные отношения.
Установка клиента freeipa на рабочую станцию и подключение к серверу.
Работы будут проводится на рабочей станции ROSA Cobalt WS. На CentOS и RedHat действия аналогичные.
Рабочая станция будет находится в филиале и принадлежать домену 01.centr.rpn.
Установка сервера freeipa в филиале.
Прежде чем устанавливать сервер в филиале несколько слов о теории и принципе организации территориально распределенной структуре FreeIPA.
Заключение
Сервер FreeIPA полностью готов к работе. Теперь вы можете добавить клиентские машины.
Extend ipa-otpd daemon to recognize idp references
ipa-otpd supports two methods at the moment:
native IPA OTP authentication
RADIUS proxy authentication
ipa-otpd itself does not implement any OAuth 2.0 calls. Instead, configuration
of the OAuth 2.0 client and IdP reference passed to the oidc_child process
provided by SSSD in sssd-idp package. oidc_child uses curl and cjose
libraries to implement OAuth 2.0 communication.