. Authorization
The advanced authorization capabilities within Spring Security represent one of the most compelling reasons for its popularity.
Irrespective of how you choose to authenticate – whether using a Spring Security-provided mechanism and provider, or integrating with a container or other non-Spring Security authentication authority – you will find the authorization services can be used within your application in a consistent and simple way.
In this part we’ll explore the different AbstractSecurityInterceptor implementations, which were introduced in Part I.
We then move on to explore how to fine-tune authorization through use of domain access control lists.
As we’ve also seen in the Technical Overview chapter, Spring Security provides interceptors which control access to secure objects such as method invocations or web requests.
A pre-invocation decision on whether the invocation is allowed to proceed is made by the AccessDecisionManager.
Whilst users can implement their own AccessDecisionManager to control all aspects of authorization, Spring Security includes several AccessDecisionManager implementations that are based on voting.
Figure 11.1, “Voting Decision Manager” illustrates the relevant classes.
Using this approach, a series of AccessDecisionVoter implementations are polled on an authorization decision.
The AccessDecisionManager then decides whether or not to throw an AccessDeniedException based on its assessment of the votes.
The AccessDecisionVoter interface has three methods:
int vote(Authentication authentication, Object object, Collection<ConfigAttribute> attrs);

boolean supports(ConfigAttribute attribute);

boolean supports(Class clazz);
Concrete implementations return an int, with possible values being reflected in the AccessDecisionVoter static fields ACCESS_ABSTAIN, ACCESS_DENIED and ACCESS_GRANTED.
A voting implementation will return ACCESS_ABSTAIN if it has no opinion on an authorization decision.
If it does have an opinion, it must return either ACCESS_DENIED or ACCESS_GRANTED.
There are three concrete AccessDecisionManager s provided with Spring Security that tally the votes.
The ConsensusBased implementation will grant or deny access based on the consensus of non-abstain votes.
Properties are provided to control behavior in the event of an equality of votes or if all votes are abstain.
The AffirmativeBased implementation will grant access if one or more ACCESS_GRANTED votes were received (i.e. a deny vote will be ignored, provided there was at least one grant vote).
Like the ConsensusBased implementation, there is a parameter that controls the behavior if all voters abstain.
The UnanimousBased provider expects unanimous ACCESS_GRANTED votes in order to grant access, ignoring abstains.
It will deny access if there is any ACCESS_DENIED vote.
Like the other implementations, there is a parameter that controls the behaviour if all voters abstain.
It is possible to implement a custom AccessDecisionManager that tallies votes differently.
For example, votes from a particular AccessDecisionVoter might receive additional weighting, whilst a deny vote from a particular voter may have a veto effect.
Whilst the AccessDecisionManager is called by the AbstractSecurityInterceptor before proceeding with the secure object invocation, some applications need a way of modifying the object actually returned by the secure object invocation.
Whilst you could easily implement your own AOP concern to achieve this, Spring Security provides a convenient hook that has several concrete implementations that integrate with its ACL capabilities.
Figure 11.2, “After Invocation Implementation” illustrates Spring Security’s AfterInvocationManager and its concrete implementations.
Like many other parts of Spring Security, AfterInvocationManager has a single concrete implementation, AfterInvocationProviderManager, which polls a list of AfterInvocationProvider s.
Each AfterInvocationProvider is allowed to modify the return object or throw an AccessDeniedException.
Indeed multiple providers can modify the object, as the result of the previous provider is passed to the next in the list.
Please be aware that if you’re using AfterInvocationManager, you will still need configuration attributes that allow the MethodSecurityInterceptor‘s AccessDecisionManager to allow an operation.
If you’re using the typical Spring Security included AccessDecisionManager implementations, having no configuration attributes defined for a particular secure method invocation will cause each AccessDecisionVoter to abstain from voting.
In turn, if the AccessDecisionManager property “allowIfAllAbstainDecisions” is false, an AccessDeniedException will be thrown.
You may avoid this potential issue by either (i) setting “allowIfAllAbstainDecisions” to true (although this is generally not recommended) or (ii) simply ensure that there is at least one configuration attribute that an AccessDecisionVoter will vote to grant access for.
This latter (recommended) approach is usually achieved through a ROLE_USER or ROLE_AUTHENTICATED configuration attribute.
It is a common requirement that a particular role in an application should automatically “include” other roles.
For example, in an application which has the concept of an “admin” and a “user” role, you may want an admin to be able to do everything a normal user can.
To achieve this, you can either make sure that all admin users are also assigned the “user” role.
Alternatively, you can modify every access constraint which requires the “user” role to also include the “admin” role.
This can get quite complicated if you have a lot of different roles in your application.
The use of a role-hierarchy allows you to configure which roles (or authorities) should include others.
An extended version of Spring Security’s RoleVoter, RoleHierarchyVoter, is configured with a RoleHierarchy, from which it obtains all the “reachable authorities” which the user is assigned.
A typical configuration might look like this:
<beanid="roleVoter"class="org.springframework.security.access.vote.RoleHierarchyVoter"><constructor-argref="roleHierarchy" /></bean><beanid="roleHierarchy"class="org.springframework.security.access.hierarchicalroles.RoleHierarchyImpl"><propertyname="hierarchy"><value>
            ROLE_ADMIN > ROLE_STAFF
            ROLE_STAFF > ROLE_USER
            ROLE_USER > ROLE_GUEST
        </value></property></bean>
Here we have four roles in a hierarchy ROLE_ADMIN ⇒ ROLE_STAFF ⇒ ROLE_USER ⇒ ROLE_GUEST.
A user who is authenticated with ROLE_ADMIN, will behave as if they have all four roles when security constraints are evaluated against an AccessDecisionManager configured with the above RoleHierarchyVoter.
The > symbol can be thought of as meaning “includes”.
Role hierarchies offer a convenient means of simplifying the access-control configuration data for your application and/or reducing the number of authorities which you need to assign to a user.
For more complex requirements you may wish to define a logical mapping between the specific access-rights your application requires and the roles that are assigned to users, translating between the two when loading the user information.
The AspectJ security interceptor is very similar to the AOP Alliance security interceptor discussed in the previous section.
Indeed we will only discuss the differences in this section.
The AspectJ interceptor is named AspectJSecurityInterceptor.
Unlike the AOP Alliance security interceptor, which relies on the Spring application context to weave in the security interceptor via proxying, the AspectJSecurityInterceptor is weaved in via the AspectJ compiler.
It would not be uncommon to use both types of security interceptors in the same application, with AspectJSecurityInterceptor being used for domain object instance security and the AOP Alliance MethodSecurityInterceptor being used for services layer security.
Let’s first consider how the AspectJSecurityInterceptor is configured in the Spring application context:
<beanid="bankManagerSecurity"class=
    "org.springframework.security.access.intercept.aspectj.AspectJMethodSecurityInterceptor"><propertyname="authenticationManager"ref="authenticationManager"/><propertyname="accessDecisionManager"ref="accessDecisionManager"/><propertyname="afterInvocationManager"ref="afterInvocationManager"/><propertyname="securityMetadataSource"><sec:method-security-metadata-source><sec:protectmethod="com.mycompany.BankManager.delete*"access="ROLE_SUPERVISOR"/><sec:protectmethod="com.mycompany.BankManager.getBalance"access="ROLE_TELLER,ROLE_SUPERVISOR"/></sec:method-security-metadata-source></property></bean>
As you can see, aside from the class name, the AspectJSecurityInterceptor is exactly the same as the AOP Alliance security interceptor.
Indeed the two interceptors can share the same securityMetadataSource, as the SecurityMetadataSource works with java.lang.reflect.Method s rather than an AOP library-specific class.
Of course, your access decisions have access to the relevant AOP library-specific invocation (ie MethodInvocation or JoinPoint) and as such can consider a range of addition criteria when making access decisions (such as method arguments).
Next you’ll need to define an AspectJ aspect.
For example:
package org.springframework.security.samples.aspectj;

import org.springframework.security.access.intercept.aspectj.AspectJSecurityInterceptor;
import org.springframework.security.access.intercept.aspectj.AspectJCallback;
import org.springframework.beans.factory.InitializingBean;

public aspect DomainObjectInstanceSecurityAspect implements InitializingBean {

    private AspectJSecurityInterceptor securityInterceptor;

    pointcut domainObjectInstanceExecution(): target(PersistableEntity)
        && execution(public * *(..)) && !within(DomainObjectInstanceSecurityAspect);

    Object around(): domainObjectInstanceExecution() {
        if (this.securityInterceptor == null) {
            return proceed();
        }

        AspectJCallback callback = new AspectJCallback() {
            public Object proceedWithObject() {
                return proceed();
            }
        };

        returnthis.securityInterceptor.invoke(thisJoinPoint, callback);
    }

    public AspectJSecurityInterceptor getSecurityInterceptor() {
        return securityInterceptor;
    }

    publicvoid setSecurityInterceptor(AspectJSecurityInterceptor securityInterceptor) {
        this.securityInterceptor = securityInterceptor;
    }

    publicvoid afterPropertiesSet() throws Exception {
        if (this.securityInterceptor == null)
            thrownew IllegalArgumentException("securityInterceptor required");
        }
    }
}
In the above example, the security interceptor will be applied to every instance of PersistableEntity, which is an abstract class not shown (you can use any other class or pointcut expression you like).
For those curious, AspectJCallback is needed because the proceed(); statement has special meaning only within an around() body.
The AspectJSecurityInterceptor calls this anonymous AspectJCallback class when it wants the target object to continue.
You will need to configure Spring to load the aspect and wire it with the AspectJSecurityInterceptor.
A bean declaration which achieves this is shown below:
<beanid="domainObjectInstanceSecurityAspect"class="security.samples.aspectj.DomainObjectInstanceSecurityAspect"factory-method="aspectOf"><propertyname="securityInterceptor"ref="bankManagerSecurity"/></bean>
That’s it!
Now you can create your beans from anywhere within your application, using whatever means you think fit (eg new Person();) and they will have the security interceptor applied.
Spring Security 3.0 introduced the ability to use Spring EL expressions as an authorization mechanism in addition to the simple use of configuration attributes and access-decision voters which have seen before.
Expression-based access control is built on the same architecture but allows complicated Boolean logic to be encapsulated in a single expression.
Spring Security uses Spring EL for expression support and you should look at how that works if you are interested in understanding the topic in more depth.
Expressions are evaluated with a “root object” as part of the evaluation context.
Spring Security uses specific classes for web and method security as the root object, in order to provide built-in expressions and access to values such as the current principal.
The base class for expression root objects is SecurityExpressionRoot.
This provides some common expressions which are available in both web and method security.
Table 11.1. Common built-in expressions
| Expression | Description |
|---|---|
| Returns For example, By default if the supplied role does not start with ‘ROLE_’ it will be added. |
| Returns For example, By default if the supplied role does not start with ‘ROLE_’ it will be added. |
| Returns For example, |
| Returns For example, |
| Allows direct access to the principal object representing the current user |
| Allows direct access to the current |
| Always evaluates to |
| Always evaluates to |
| Returns |
| Returns |
| Returns |
| Returns |
| Returns |
| Returns |
To use expressions to secure individual URLs, you would first need to set the use-expressions attribute in the <http> element to true.
Spring Security will then expect the access attributes of the <intercept-url> elements to contain Spring EL expressions.
The expressions should evaluate to a Boolean, defining whether access should be allowed or not.
For example:
<http><intercept-urlpattern="/admin*"access="hasRole('admin') and hasIpAddress('192.168.1.0/24')"/>
    ...
</http>
Here we have defined that the “admin” area of an application (defined by the URL pattern) should only be available to users who have the granted authority “admin” and whose IP address matches a local subnet.
We’ve already seen the built-in hasRole expression in the previous section.
The expression hasIpAddress is an additional built-in expression which is specific to web security.
It is defined by the WebSecurityExpressionRoot class, an instance of which is used as the expression root object when evaluation web-access expressions.
This object also directly exposed the HttpServletRequest object under the name request so you can invoke the request directly in an expression.
If expressions are being used, a WebExpressionVoter will be added to the AccessDecisionManager which is used by the namespace.
So if you aren’t using the namespace and want to use expressions, you will have to add one of these to your configuration.
Method security is a bit more complicated than a simple allow or deny rule.
Spring Security 3.0 introduced some new annotations in order to allow comprehensive support for the use of expressions.
There are four annotations which support expression attributes to allow pre and post-invocation authorization checks and also to support filtering of submitted collection arguments or return values.
They are @PreAuthorize, @PreFilter, @PostAuthorize and @PostFilter.
Their use is enabled through the global-method-security namespace element:
<global-method-securitypre-post-annotations="enabled"/>
The most obviously useful annotation is @PreAuthorize which decides whether a method can actually be invoked or not.
For example (from the”Contacts” sample application)
@PreAuthorize("hasRole('USER')")publicvoid create(Contact contact);
which means that access will only be allowed for users with the role “ROLE_USER”.
Obviously the same thing could easily be achieved using a traditional configuration and a simple configuration attribute for the required role.
But what about:
@PreAuthorize("hasPermission(#contact, 'admin')")publicvoid deletePermission(Contact contact, Sid recipient, Permission permission);
Here we’re actually using a method argument as part of the expression to decide whether the current user has the “admin”permission for the given contact.
The built-in hasPermission() expression is linked into the Spring Security ACL module through the application context, as we’llsee below.
You can access any of the method arguments by name as expression variables.
There are a number of ways in which Spring Security can resolve the method arguments.
Spring Security uses DefaultSecurityParameterNameDiscoverer to discover the parameter names.
By default, the following options are tried for a method as a whole.
Any Spring-EL functionality is available within the expression, so you can also access properties on the arguments.
For example, if you wanted a particular method to only allow access to a user whose username matched that of the contact, you could write
@PreAuthorize("#contact.name == authentication.name")publicvoid doSomething(Contact contact);
Here we are accessing another built-in expression, authentication, which is the Authentication stored in the security context.
You can also access its “principal” property directly, using the expression principal.
The value will often be a UserDetails instance, so you might use an expression like principal.username or principal.enabled.
Less commonly, you may wish to perform an access-control check after the method has been invoked.
This can be achieved using the @PostAuthorize annotation.
To access the return value from a method, use the built-in name returnObject in the expression.
There are some built-in expressions which are specific to method security, which we have already seen in use above.
The filterTarget and returnValue values are simple enough, but the use of the hasPermission() expression warrants a closer look.
hasPermission() expressions are delegated to an instance of PermissionEvaluator.
It is intended to bridge between the expression system and Spring Security’s ACL system, allowing you to specify authorization constraints on domain objects, based on abstract permissions.
It has no explicit dependencies on the ACL module, so you could swap that out for an alternative implementation if required.
The interface has two methods:
boolean hasPermission(Authentication authentication, Object targetDomainObject,
                            Object permission);

boolean hasPermission(Authentication authentication, Serializable targetId,
                            String targetType, Object permission);
which map directly to the available versions of the expression, with the exception that the first argument (the Authentication object) is not supplied.
The first is used in situations where the domain object, to which access is being controlled, is already loaded.
Then expression will return true if the current user has the given permission for that object.
The second version is used in cases where the object is not loaded, but its identifier is known.
An abstract “type” specifier for the domain object is also required, allowing the correct ACL permissions to be loaded.
This has traditionally been the Java class of the object, but does not have to be as long as it is consistent with how the permissions are loaded.
To use hasPermission() expressions, you have to explicitly configure a PermissionEvaluator in your application context.
This would look something like this:
<security:global-method-securitypre-post-annotations="enabled"><security:expression-handlerref="expressionHandler"/></security:global-method-security><beanid="expressionHandler"class=
"org.springframework.security.access.expression.method.DefaultMethodSecurityExpressionHandler"><propertyname="permissionEvaluator"ref="myPermissionEvaluator"/></bean>
Where myPermissionEvaluator is the bean which implements PermissionEvaluator.
Usually this will be the implementation from the ACL module which is called AclPermissionEvaluator.
See the “Contacts” sample application configuration for more details.
From version 2.0 onwards Spring Security has improved support substantially for adding security to your service layer methods.
It provides support for JSR-250 annotation security as well as the framework’s original @Secured annotation.
From 3.0 you can also make use of new expression-based annotations.
You can apply security to a single bean, using the intercept-methods element to decorate the bean declaration, or you can secure multiple beans across the entire service layer using the AspectJ style pointcuts.
Complex applications often will find the need to define access permissions not simply at a web request or method invocation level.
Instead, security decisions need to comprise both who (Authentication), where (MethodInvocation) and what (SomeDomainObject).
In other words, authorization decisions also need to consider the actual domain object instance subject of a method invocation.
Imagine you’re designing an application for a pet clinic.
There will be two main groups of users of your Spring-based application: staff of the pet clinic, as well as the pet clinic’s customers.
The staff will have access to all of the data, whilst your customers will only be able to see their own customer records.
To make it a little more interesting, your customers can allow other users to see their customer records, such as their “puppy preschool” mentor or president of their local “Pony Club”.
Using Spring Security as the foundation, you have several approaches that can be used:
Each one of these approaches is perfectly legitimate.
However, the first couples your authorization checking to your business code.
The main problems with this include the enhanced difficulty of unit testing and the fact it would be more difficult to reuse the Customer authorization logic elsewhere.
Obtaining the GrantedAuthority[] s from the Authentication object is also fine, but will not scale to large numbers of Customer s.
If a user might be able to access 5,000 Customer s (unlikely in this case, but imagine if it were a popular vet for a large Pony Club!) the amount of memory consumed and time required to construct the Authentication object would be undesirable.
The final method, opening the Customer directly from external code, is probably the best of the three.
It achieves separation of concerns, and doesn’t misuse memory or CPU cycles, but it is still inefficient in that both the AccessDecisionVoter and the eventual business method itself will perform a call to the DAO responsible for retrieving the Customer object.
Two accesses per method invocation is clearly undesirable.
In addition, with every approach listed you’ll need to write your own access control list (ACL) persistence and business logic from scratch.
Fortunately, there is another alternative, which we’ll talk about below.
Spring Security’s ACL services are shipped in the spring-security-acl-xxx.jar.
You will need to add this JAR to your classpath to use Spring Security’s domain object instance security capabilities.
Spring Security’s domain object instance security capabilities centre on the concept of an access control list (ACL).
Every domain object instance in your system has its own ACL, and the ACL records details of who can and can’t work with that domain object.
With this in mind, Spring Security delivers three main ACL-related capabilities to your application:
As indicated by the first bullet point, one of the main capabilities of the Spring Security ACL module is providing a high-performance way of retrieving ACLs.
This ACL repository capability is extremely important, because every domain object instance in your system might have several access control entries, and each ACL might inherit from other ACLs in a tree-like structure (this is supported out-of-the-box by Spring Security, and is very commonly used).
Spring Security’s ACL capability has been carefully designed to provide high performance retrieval of ACLs, together with pluggable caching, deadlock-minimizing database updates, independence from ORM frameworks (we use JDBC directly), proper encapsulation, and transparent database updating.
Given databases are central to the operation of the ACL module, let’s explore the four main tables used by default in the implementation.
The tables are presented below in order of size in a typical Spring Security ACL deployment, with the table with the most rows listed last:
- ACL_SID allows us to uniquely identify any principal or authority in the system (“SID” stands for “security identity”).
The only columns are the ID, a textual representation of the SID, and a flag to indicate whether the textual representation refers to a principal name or aGrantedAuthority.
Thus, there is a single row for each unique principal orGrantedAuthority.
When used in the context of receiving a permission, a SID is generally called a “recipient”. - ACL_CLASS allows us to uniquely identify any domain object class in the system.
The only columns are the ID and the Java class name.
Thus, there is a single row for each unique Class we wish to store ACL permissions for. - ACL_OBJECT_IDENTITY stores information for each unique domain object instance in the system.
Columns include the ID, a foreign key to the ACL_CLASS table, a unique identifier so we know which ACL_CLASS instance we’re providing information for, the parent, a foreign key to the ACL_SID table to represent the owner of the domain object instance, and whether we allow ACL entries to inherit from any parent ACL.
We have a single row for every domain object instance we’re storing ACL permissions for. - Finally, ACL_ENTRY stores the individual permissions assigned to each recipient.
Columns include a foreign key to the ACL_OBJECT_IDENTITY, the recipient (ie a foreign key to ACL_SID), whether we’ll be auditing or not, and the integer bit mask that represents the actual permission being granted or denied.
We have a single row for every recipient that receives a permission to work with a domain object.
As mentioned in the last paragraph, the ACL system uses integer bit masking.
Don’t worry, you need not be aware of the finer points of bit shifting to use the ACL system, but suffice to say that we have 32 bits we can switch on or off.
Each of these bits represents a permission, and by default the permissions are read (bit 0), write (bit 1), create (bit 2), delete (bit 3) and administer (bit 4).
It’s easy to implement your own Permission instance if you wish to use other permissions, and the remainder of the ACL framework will operate without knowledge of your extensions.
It is important to understand that the number of domain objects in your system has absolutely no bearing on the fact we’ve chosen to use integer bit masking.
Whilst you have 32 bits available for permissions, you could have billions of domain object instances (which will mean billions of rows in ACL_OBJECT_IDENTITY and quite probably ACL_ENTRY).
We make this point because we’ve found sometimes people mistakenly believe they need a bit for each potential domain object, which is not the case.
Now that we’ve provided a basic overview of what the ACL system does, and what it looks like at a table structure, let’s explore the key interfaces.
The key interfaces are:
Acl: Every domain object has one and only oneAclobject, which internally holds theAccessControlEntrys as well as knows the owner of theAcl.
An Acl does not refer directly to the domain object, but instead to anObjectIdentity.
TheAclis stored in the ACL_OBJECT_IDENTITY table.AccessControlEntry: AnAclholds multipleAccessControlEntrys, which are often abbreviated as ACEs in the framework.
Each ACE refers to a specific tuple ofPermission,SidandAcl.
An ACE can also be granting or non-granting and contain audit settings.
The ACE is stored in the ACL_ENTRY table.Permission: A permission represents a particular immutable bit mask, and offers convenience functions for bit masking and outputting information.
The basic permissions presented above (bits 0 through 4) are contained in theBasePermissionclass.Sid: The ACL module needs to refer to principals andGrantedAuthority[]s.
A level of indirection is provided by theSidinterface, which is an abbreviation of “security identity”.
Common classes includePrincipalSid(to represent the principal inside anAuthenticationobject) andGrantedAuthoritySid.
The security identity information is stored in the ACL_SID table.ObjectIdentity: Each domain object is represented internally within the ACL module by anObjectIdentity.
The default implementation is calledObjectIdentityImpl.AclService: Retrieves theAclapplicable for a givenObjectIdentity.
In the included implementation (JdbcAclService), retrieval operations are delegated to aLookupStrategy.
TheLookupStrategyprovides a highly optimized strategy for retrieving ACL information, using batched retrievals(BasicLookupStrategy) and supporting custom implementations that leverage materialized views, hierarchical queries and similar performance-centric, non-ANSI SQL capabilities.MutableAclService: Allows a modifiedAclto be presented for persistence.
It is not essential to use this interface if you do not wish.
Please note that our out-of-the-box AclService and related database classes all use ANSI SQL.
This should therefore work with all major databases.
At the time of writing, the system had been successfully tested using Hypersonic SQL, PostgreSQL, Microsoft SQL Server and Oracle.
Two samples ship with Spring Security that demonstrate the ACL module.
The first is the Contacts Sample, and the other is the Document Management System (DMS) Sample.
We suggest taking a look over these for examples.
To get starting using Spring Security’s ACL capability, you will need to store your ACL information somewhere.
This necessitates the instantiation of a DataSource using Spring.
The DataSource is then injected into a JdbcMutableAclService and BasicLookupStrategy instance.
The latter provides high-performance ACL retrieval capabilities, and the former provides mutator capabilities.
Refer to one of the samples that ship with Spring Security for an example configuration.
You’ll also need to populate the database with the four ACL-specific tables listed in the last section (refer to the ACL samples for the appropriate SQL statements).
Once you’ve created the required schema and instantiated JdbcMutableAclService, you’ll next need to ensure your domain model supports interoperability with the Spring Security ACL package.
Hopefully ObjectIdentityImpl will prove sufficient, as it provides a large number of ways in which it can be used.
Most people will have domain objects that contain a public Serializable getId() method.
If the return type is long, or compatible with long (eg an int), you will find you need not give further consideration to ObjectIdentity issues.
Many parts of the ACL module rely on long identifiers.
If you’re not using long (or an int, byte etc), there is a very good chance you’ll need to reimplement a number of classes.
We do not intend to support non-long identifiers in Spring Security’s ACL module, as longs are already compatible with all database sequences, the most common identifier data type, and are of sufficient length to accommodate all common usage scenarios.
The following fragment of code shows how to create an Acl, or modify an existing Acl:
ObjectIdentity oi = new ObjectIdentityImpl(Foo.class, new Long(44));
Sid sid = new PrincipalSid("Samantha");
Permission p = BasePermission.ADMINISTRATION;


MutableAcl acl = null;
try {
acl = (MutableAcl) aclService.readAclById(oi);
} catch (NotFoundException nfe) {
acl = aclService.createAcl(oi);
}


acl.insertAce(acl.getEntries().length, p, sid, true);
aclService.updateAcl(acl);
In the example above, we’re retrieving the ACL associated with the “Foo” domain object with identifier number 44.
We’re then adding an ACE so that a principal named “Samantha” can “administer” the object.
The code fragment is relatively self-explanatory, except the insertAce method.
The first argument to the insertAce method is determining at what position in the Acl the new entry will be inserted.
In the example above, we’re just putting the new ACE at the end of the existing ACEs.
The final argument is a Boolean indicating whether the ACE is granting or denying.
Most of the time it will be granting (true), but if it is denying (false), the permissions are effectively being blocked.
Spring Security does not provide any special integration to automatically create, update or delete ACLs as part of your DAO or repository operations.
Instead, you will need to write code like shown above for your individual domain objects.
It’s worth considering using AOP on your services layer to automatically integrate the ACL information with your services layer operations.
We’ve found this quite an effective approach in the past.
Once you’ve used the above techniques to store some ACL information in the database, the next step is to actually use the ACL information as part of authorization decision logic.
You have a number of choices here.
You could write your own AccessDecisionVoter or AfterInvocationProvider that respectively fires before or after a method invocation.
Such classes would use AclService to retrieve the relevant ACL and then call Acl.isGranted(Permission[] permission, Sid[] sids, boolean administrativeMode) to decide whether permission is granted or denied.
Alternately, you could use our AclEntryVoter, AclEntryAfterInvocationProvider or AclEntryAfterInvocationCollectionFilteringProvider classes.
All of these classes provide a declarative-based approach to evaluating ACL information at runtime, freeing you from needing to write any code.
Please refer to the sample applications to learn how to use these classes.
Пример подключения Spring Security
Посмотрим на практике, какие настройки включаются по умолчанию при добавлении в проект Spring Security.
Создание проекта и подключение зависимостей
Итак, мы готовы, чтобы написать обещанное простое приложение с регистрацией и входом в учетную запись пользователя. Используемые технологии: Spring Boot, Spring Security, Spring Data JPA, Hibernate, MySQL, JSP, Bootstrap и Docker Compose.
Authentication до аутентификации
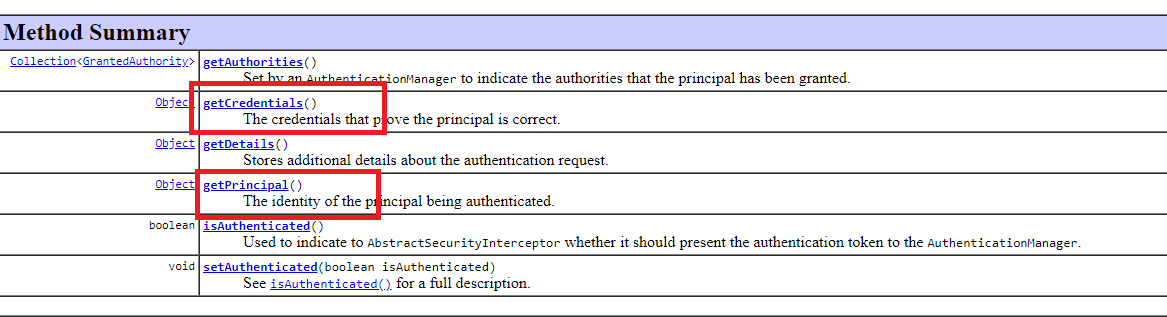
Как видно в коде выше, метод authenticate() получает на вход объект Authentication с именем и паролем, полученными от клиента и требующими проверку. Имя хранится в principal, а пароль в credenticals (до проверки, после проверки будет иначе):
Содержимое объекта Authentication можно проверить, если запустить предыдущий пример и поставить break-point в методе authenticate() класса ProviderManager. А потом по адресу /login отправить POST-запрос с формы ввода имени/пароля:
public class ProviderManager implements AuthenticationManager, MessageSourceAware, InitializingBean {
...
}
Найти класс ProviderManager — Ctrl N в IntelliJ IDEA
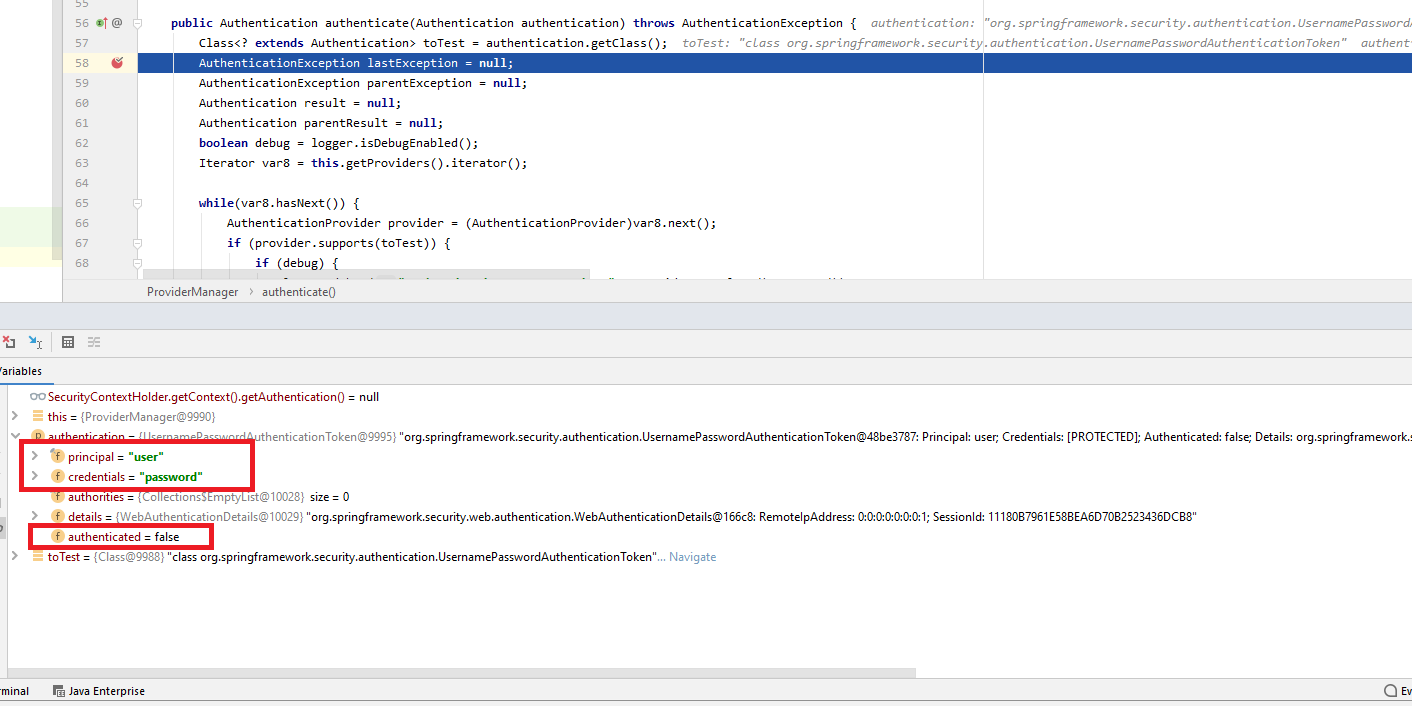
isAuthenticated() до аутентификации равно false.
Если аутентификация не прошла (имя и пароль неверны), то выбрасывается исключение BadCredentials.
В случае же успеха возвращается тоже объект Authentication, но заполненный по-другому.
Ldap-аутентификация
Lightweight Directory Access Protocol (LDAP) — протокол аутентификации учетных записей пользователей в организациях. Позволяет определять структуру пользователей и групп пользователей, назначать им права доступа.
Дополнительную информацию вы можете получить в официальном руководстве по использованию аутентификации LDAP.
Remember me authentication
Это встроенный механизм распознавания, благодаря которому пользователям не нужно вводить учетные данные при каждом посещении сайта.
Spring Security предлагает несколько способов реализации этого типа аутентификации — например, хеширование данных с помощью секретного ключа или хранение постоянного токена в базе данных.
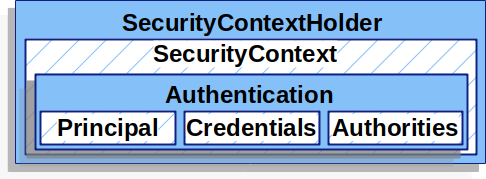
Securitycontext — хранилище объекта authentication
Допустим, аутентификация прошла успешно — это значит, имя и пароль верные.
Тогда объект Authentication сохраняется в SecurityContext, а тот, в свою очередь, — в SecurityContextHolder:
Текущего пользователя из него можно получить так:
Аутентификация in-memory
Для сохранения информации о пользователях и выполнения аутентификации можно использовать временную базу данных, которая остается в оперативной памяти приложения.
Это полезно при разработке и тестировании. Реальная база данных при таком подходе остается нетронутой.
Восстановление authentication из сессии
Аутентификация в нашем примере происходит только раз. Коль скоро она прошла успешно, authentication восстанавливается из контекста, а в итоге из сессии при последующих запросах. Происходит это в SecurityContextPersistenceFilter.
Добавление зависимостей
Содержимое файла pom.xml:
Запуск docker-контейнера
Подготовьте Dockerfile для приложения Java / Spring Boot и файл docker-compose.yaml для MySQL Server.
Содержимое Dockerfile:
FROM maven:3.5-jdk-8
Содержимое docker-compose.yml:
version: '3'
services:
  hk-mysql:
    container_name: hk-mysql
    image: mysql/mysql-server:5.7
    environment:
      MYSQL_DATABASE: test
      MYSQL_ROOT_PASSWORD: hellokoding
      MYSQL_ROOT_HOST: '%'
    ports:
    - "3306:3306"
    restart: always

  registration-login:
    build: .
    volumes:
    - .:/app
    - ~/.m2:/root/.m2
    working_dir: /app
    ports:
    - 8080:8080
    command: mvn clean spring-boot:run
    depends_on:
    - hk-mysql
Перейдите в корень проекта и запустите Docker:
docker-compose up
Использование репозиториев spring data jpa
Репозитории помогают сократить шаблонный код, который необходим для реализации уровней доступа к данным в разных хранилищах — MySQL, PostgreSQL и других. В них описываются некоторые функции для создания, чтения, обновления и удаления данных из БД — например, findAll, findById, save, saveAll, delete и deleteAll.
Настройка аутентификации
Spring Security использует Form-Based-аутентификацию. Пользователь отправляет имя и пароль через форму. Сервер берет эти данные из запроса как POST-параметры.
Теперь посмотрим, как сервер хранит данные пользователей. Интересно, что они находятся не в базе, не на LDAP-сервере, а в оперативной памяти приложения. И хранятся там до тех пор, пока оно запущено. Такая аутентификация называется In-Memory authentication.
Чтобы отредактировать пользователя, необходимо заново запустить приложение. Для продакшена такой вариант не подходит, но для экспериментов в процессе разработки это простой и полезный метод.
Приложение хранит имя и пароль в памяти. Вы можете посмотреть эти данные через консоль. Чтобы каждый раз не лезть в консоль, воспользуйтесь файлом конфигурации application.yml. Зафиксируйте в нем имя и пароль пользователя.
Определение валидатора
Входные данные будет проверять валидатор. Коды ошибок определяются в validation.properties.
Подготовка
Сгенерируйте на Spring Initializr приложение с зависимостью Web:
Напишите REST-контроллер:
@RestController
public class HelloController {
    @GetMapping("/api/hello")
    public String hello(){
        return "Highload";
    }
}
Проверьте приложение в браузере. Сейчас доступ к нему имеют все пользователи.
Подключение spring security
Добавьте Maven-зависимость, чтобы подключить Spring Security:
Создание проекта
Структура проекта должна выглядеть так:
Создание сервиса безопасности
Сервис безопасности нужен для предоставления текущего авторизованного пользователя и автоматического входа в систему после регистрации.
Создание службы пользователя
Также нужно создать службу для регистрации пользователей.
Тестирование
Чтобы запустить приложение на локальном сервере MySQL, измените в application.properties «hk-mysql» на «localhost», перейдите в корневой каталог проекта и выполните команду:
mvn clean spring-boot:run
Перейдите в браузере по адресу localhost: 8080 и протестируйте приложение. Попробуйте заходить под разными пользователями, выходить, добавлять новые функции и изменять права доступа.
Исходный код нашего проекта — в репозитории на GitHub.
Типы аутентификации в spring security
Есть несколько стандартных типов хранения и извлечения пользователя, и за каждый из них отвечает свой AuthenticationProvider. AuthenticationManager делегирует провайдеру извлечь данные их хранилища. В Spring Security реализованы несколько стандартных провайдеров, все они задаются в методе configure():
@EnableWebSecurity(debug = true)
public class SecurityConfig extends WebSecurityConfigurerAdapter
   @Override
    public void configure(AuthenticationManagerBuilder auth) throws Exception {
        auth.inMemoryAuthentication()
                ....
    }
...
}
Итак, провайдеры:
А можно написать свой, так чаще всего и делают (тоже сделано в следующей статье).
Управление сессией
Spring Security предоставляет механизмы для управления сеансом пользователя. Он создает эти механизмы контроля при входе в систему и уничтожает при выходе.
Для обеспечения безопасности доступны дополнительные средства, которые помогают, например, избежать отслеживания сеансов.
Шаблоны просмотра jsp (bootstrap)
Здесь достаточно трех файлов: для регистрации, входа и приветствия.
Шифрование паролей
Spring Security не ограничивается аутентификацией. Фреймворк также помогает решить проблему с безопасным хранением паролей.
Итоги
В тексте выше приводились примеры кода и ставились break-point приложения из статьи.