NavBar.vue And App.vue Components
In your src/components folder, delete the HelloWorld.vue and a new file called NavBar.vue.
This is the component for our navigation bar, it links to different pages of our component been routed here. Each router link points to a route/page on our app.
Actions
Actions are functions that are used to commit a mutation to change the state or can be used to dispatch i.e calls another action. It can be called in different components or views and then commits mutations of our state;
Register Action
Add navigation bar to vue app
This is the root container for our application that contains navigation bar. We will add router-view here.
src/App.vue
Add the auth0 configuration variables to express
🛠 Create a .env file for the API Server under the auth0-express-js-sample directory:
touch .env🛠 Populate this auth0-express-js-sample/.env file as follows:
Adding authentication to your vue app
The final thing left to do is add login functionality to the application. You’re going to use Auth0’s authentication service to do this.
Once you’re registered, you’ll be taken to the Auth0 management dashboard.
- Click on “Applications” in the left sidebar
- Click on the big red button that says “Create Application”
- Name it “Vue Events” (or anything you’d like)
- Click on “Single Page Web Applications” for “application type”
- Click “Create”
🛠️️ Next, click into “Settings” to fill in some information that Auth0 needs to configure authentication for your application.
Application setup
You’re going to make a separate folder for the server code that you’ll be working on. Keeping the client code (Vue app) and server code (Express app) in the same parent folder makes it easier to switch back and forth while still keeping them separated.
First, make a new folder called vue-express-events-auth that will serve as the parent folder for client and server.
Since the client side of this application is already built, you’re just going to clone the Vue application repo and call it client. Then make a new folder inside vue-express-events-auth and call it server.
Babel config / run commands file
Path: /.babelrc
The babel config file defines the presets used by babel to transpile the ES6 code. The babel transpiler is run by webpack via the babel-loader module configured in the webpack.config.js file below.
{
  "presets": [
      "env",
      "stage-0"
  ]
}
Client setup
Now that everything is split up nicely, it’s time to pull the dependencies into the client app. In your terminal, switch into the client folder and run:
npminstallConnect vue.js with auth0
The best part of the Auth0 platform is how streamlined it is to get started by following these steps:
Create a communication bridge between vue.js and auth0
When you use Auth0, you don’t have to build login forms. Auth0 offers a Universal Login page to reduce the overhead of adding and managing authentication.
How does Universal Login work?
Create a login button
🛠 Create a LoginButton.vue file under the src/components/ directory:
touch src/components/LoginButton.vue🛠 Populate src/components/LoginButton.vue like so:
Create a logout button
🛠 Create a LogoutButton.vue file under the src/components/ directory:
touch src/components/LogoutButton.vuePopulate src/components/LogoutButton.vue like so:
Create an authentication wrapper
Next, you’re going to create a reusable wrapper Vue object around the Auth0 SDK. You’ll also create a Vue plugin that exposes this wrapper to the rest of the application.
🛠️️ Create a new file and folder for this. Make sure you’re still in the events-app root directory and enter:
mkdir src/auth
touch src/auth/index.js
🛠️️ Now open up the newly created src/auth/index.js file and paste in the following:
Create services
We create two services in src/services folder:
Creating the api in the auth0 dashboard
Head to your Auth0 management dashboard and click on “APIs” in the menu on the left-hand side.
Then click on the big red “Create API” button in the top-right corner to create the API that you’ll be connecting to your Express application.
Fill out the following information and then press “Create”:
Note: This is just an identifier for the API. We recommend using a URL, but it will never be called and doesn’t have to be a publicly available URL.
Define routes for vue router
Now we define all routes for our Vue Application.
src/router.js
Define vuex authentication module
We put Vuex module for authentication in src/store folder.
Deploying the vue.js app to microsoft azure
For instructions on how to deploy the Vue.js app to Azure with a real backend api built with ASP.NET Core and SQL Server see Vue.js ASP.NET Core SQL on Azure – How to Deploy a Full Stack App to Microsoft Azure.
Further reading
For more details about ways to use Axios, please visit:Axios request: Get/Post/Put/Delete example
Fullstack CRUD App:
Integration:– Integrate Vue.js with Spring Boot– Integrate Vue App with Node.js Express
Handle unauthorized access
If you want to check Authorized status everytime a navigating action is trigger, just add router.beforeEach() at the end of src/router.js like this:
Home page
This is a public page.
src/views/Home.vue
Index.html
Next, open up public/index.html, and you’ll see a fairly standard index HTML file.
Install auth0 spa package
🛠️️ Head back to the terminal and install Auth0’s auth0-spa-js package in the application’s root directory.
npminstall @auth0/auth0-spa-jsInstalling node and npm
Node.js is a runtime environment that uses JavaScript on the server. This makes it very popular in modern JavaScript applications because you can use JavaScript across the board: on the frontend and backend.
Node.js comes with npm, a Node package manager. You can download Node.js here.
Let’s get started!
Integrate the login and logout buttons
Let’s wrap the LoginButton and LogoutButton into a component called AuthenticationButton.
🛠 Create an AuthenticationButton.vue file under the src/components/ directory:
touch src/components/AuthenticationButton.vue🛠 Populate src/components/AuthenticationButton.vue with the following code:
There are some advantages to using this AuthenticationButton component wrapper:
Integrating auth0 into the express app
The end goal is to require the client to have a validated access token every time it makes a request to the API. You’ll handle getting that access token later on in the client code.
Right now, you need to switch your focus back to that server/server.js file on the Express side. The client is going to make a request to the API and in that request will be an access token.
Here’s what you need to do to secure the API:
Create a middleware function to validate the access token
Enable the middleware in the routes you want to be protected
Once that’s done, you’ll switch back to the client and work on issuing the access token and adding it to the API request.
In your terminal, make sure you’re in the server folder and run:
npminstall express-jwt jwks-rsaLogin
The setup function for the login component is almost identical, except we are calling a different API endpoint:
const{loading,data,error,post,errorMessage,errorFields}=useApi("auth/login")// Authentication detailsconst{setUser}=useAuth();// Router instanceconstrouter=useRouter();// Component dataconstpayload=reactive<LoginPayload>({email:undefined,password:undefined,rememberMe:false,});// On submit, send POST request to /auth/loginconstsubmit=()=>{post(payload).then(()=>{// If successful, update the Auth statesetUser(data.value,payload.rememberMe);// Redirect to the home pagerouter.push({name:"home"});});};return{loading,submit,errorMessage,...toRefs(payload),};Main.js
The first file to note is the src/main.js file. This will be the entry point for your Vue application.
import Vue from'vue';import App from'./App.vue';import router from'./router';

Vue.config.productionTip =false;newVue({
  router,render:(h)=>h(App),}).$mount('#app');
You have your imports at the top of the file:
Next, you have Vue.config.productionTip =false, which sets the app in development mode.
Modules
Modules are different segments of our store that handles similar tasks together, including:
Before we proceed, let’s edit our main.js file.
Npm package.json
Path: /package.json
The package.json file contains project configuration information including package dependencies which get installed when you run npm install. Full documentation is available on the npm docs website.
Resources
Explore more on
Role-based pages
We have 3 pages for accessing protected data:
This is an example, other Page are similar to this Page.
Screenshots
– Signup Page:
– Login Page & Profile Page (for successful Login):
Setting up
Alright, let’s get started with some code.
First, open up your terminal and switch to the directory that you want to store the project in.
You’re going to create this new project using the Vue CLI.
🛠️️ The Vue CLI tool helps get up and running with Vue quickly by letting you choose from pre-configured build setups. To use the CLI, run the following in your terminal:
npx @vue/cli create events-appThis creates a new folder called events-app and starts the installation process in that folder.
Note: npx allows you to use the Vue CLI without installing it globally. It’s available in versions of npm >= 5.2.0.
The CLI will now ask you a few questions so that it can set up the app correctly. The options that this tutorial uses are listed below. Press ENTER to select.
🛠️️ Step 1: Pick a preset — Manually select features
? Please pick a preset:
  default (babel, eslint)> Manually select features
🛠️️ Step 2: Check the features needed — Babel, Router, CSS Pre-processors, Linter/Formatter
Press SPACE to select multiple features and ENTER once you have all features selected.
? Check the features needed for your project: (Press <space> to select, <a> to toggle all, <i> to invert selection)
 ◉ Babel
 ◯ TypeScript
 ◯ Progressive Web App (PWA) Support
 ◉ Router
 ◯ Vuex
 ◉ CSS Pre-processors
 ◉ Linter / Formatter
 ◯ Unit Testing
 ◯ E2E Testing
🛠️️ Step 3: History mode — Y
? Use history mode for router? (Requires proper server setup for index fallback in production)(Y/n) YNote: This will remove the default hash (#) from URLs.
🛠️️ Step 4: CSS pre-processor — Sass/SCSS(with dart-sass)
? Pick a CSS pre-processor (PostCSS, Autoprefixer and CSS Modules are supported by default): (Use arrow keys)
❯ Sass/SCSS (with dart-sass)
  Sass/SCSS (with node-sass)
  Less
  Stylus
Note:Dart Sass is the primary implementation of Sass.
🛠️️ Step 5: Pick a linter/formatter —ESLint with error prevention only
? Pick a linter / formatter config: (Use arrow keys)
❯ ESLint with error prevention only
  ESLint   Airbnb config
  ESLint   Standard config
  ESLint   Prettier
🛠️️ Step 6: Additional lint features — Lint and fix on commit
? Pick additional lint features:
  ◯ Lint on save
❯ ◉ Lint and fix on commit
🛠️️ Step 7: Config location — In dedicated config files
? Where do you prefer placing config for Babel, PostCSS, ESLint, etc.? (Use arrow keys)
❯ In dedicated config files
  In package.json
🛠️️ Step 8: Save as preset — N
? Save this as a preset for future projects? (y/N) NNow the CLI will configure your application. It will also install the dependencies, so give it a little time (~30 seconds).
🛠️️ Once it’s finished, you can start the application by running npm run serve or yarn serve:
cd events-app
npm run serve
Setup vue app modules
Run following command to install neccessary modules:
npm install vue-router
npm install vuex
npm install [email protected]
npm install axios
npm install bootstrap jquery popper.js
npm install @fortawesome/fontawesome-svg-core @fortawesome/free-solid-svg-icons @fortawesome/vue-fontawesome
After the installation is done, you can check dependencies in package.json file.
"dependencies": {
  "@fortawesome/fontawesome-svg-core": "^1.2.25",
  "@fortawesome/free-solid-svg-icons": "^5.11.2",
  "@fortawesome/vue-fontawesome": "^0.1.7",
  "axios": "^0.19.0",
  "bootstrap": "^4.3.1",
  "core-js": "^2.6.5",
  "jquery": "^3.4.1",
  "popper.js": "^1.15.0",
  "vee-validate": "^2.2.15",
  "vue": "^2.6.10",
  "vue-router": "^3.0.3",
  "vuex": "^3.0.1"
},
Open src/main.js, add code below:
Source code
You can find the complete source code for this tutorial on Github.
Vue 3 version: Vue 3 Authentication with JWT, Vuex, Axios and Vue Router
State
In our state dict, we are going to define our data, and their default values:
Technology
We will use these modules:
- vue: 2.6.10
- vue-router: 3.0.3
- vuex: 3.0.1
- axios: 0.19.0
- vee-validate: 2.2.15
- bootstrap: 4.3.1
- vue-fontawesome: 0.1.7
Using bulma for styling
To make styling a little easier, you’re going to use Bulma, which is an open-source CSS framework.
🛠️️ Switch to the events-app folder and then enter the command below to install Bulma:
cd../..npminstall bulma🛠️️ Now open up src/main.js in your editor and import Bulma by adding this to the top of the file after all of the other imports:
import'bulma/css/bulma.css';🛠️️ Start the app up one more time so that you can see your work in progress as you continue building in the next section.
npm run serveVue helpers index
Path: /src/_helpers/index.js
The helpers index file groups all helper exports together so they can be imported in other parts of the app using only the folder path, and enables importing multiple helpers in a single statement (e.g. import { helper1, helper2, … } from ‘../_helpers’).
export * from './fake-backend';
export * from './router';
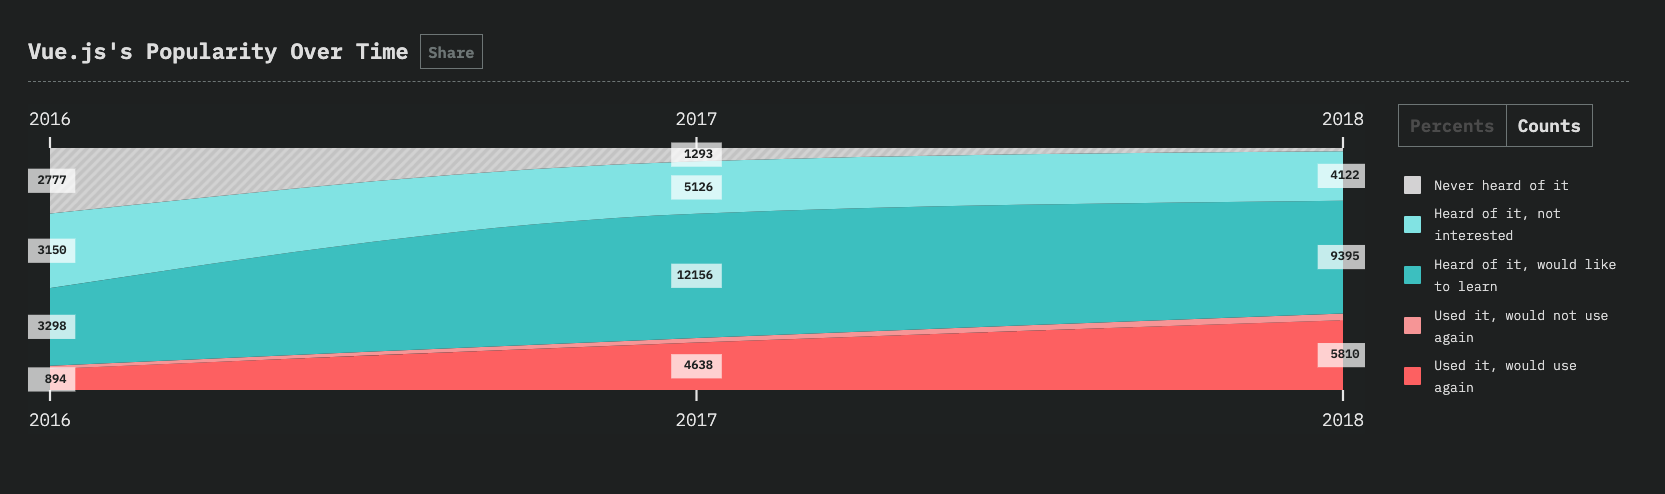
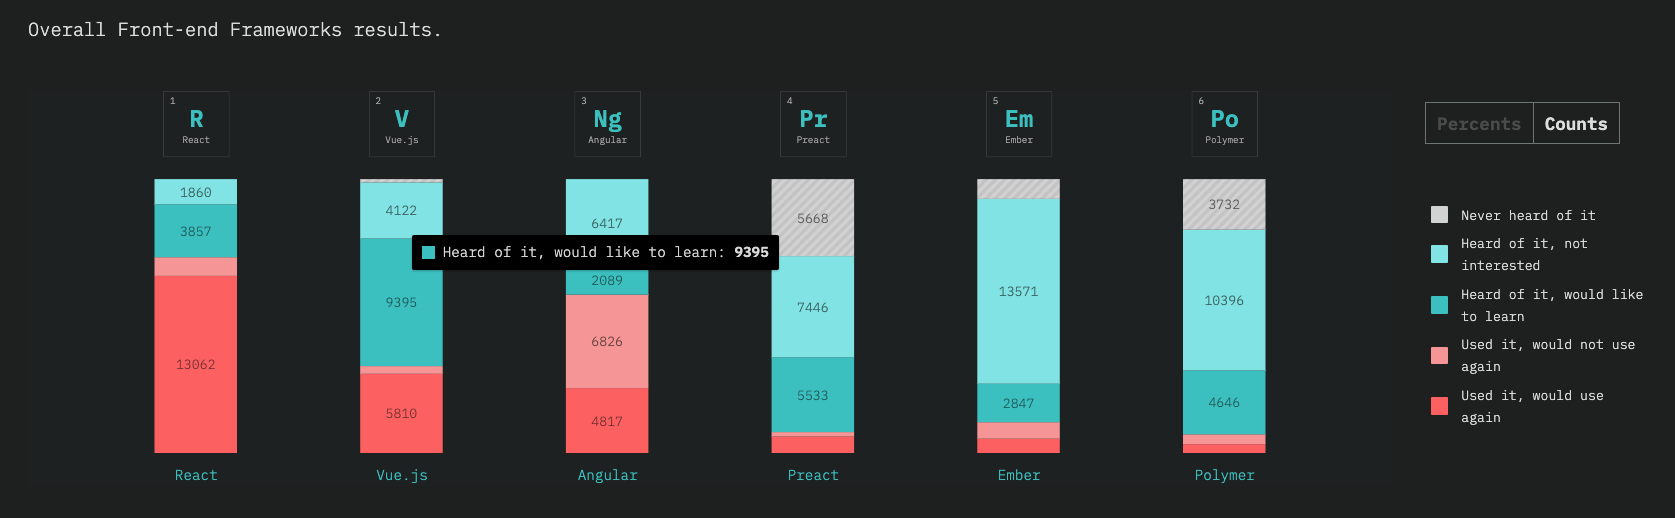
export * from './auth-header';Vue history and popularity
Vue.js is a JavaScript framework created by Evan You that has blown up in popularity over the last few years.
Vue login page component
Path: /src/login/LoginPage.vue
Vue register page
This page is similar to Login Page.
For form validation, we have some more details:
For form submission, we dispatch ‘auth/register’ Vuex Action.
src/views/Register.vue
Vue register page component
Path: /src/register/RegisterPage.vue
Vue router
Path: /src/_helpers/router.js
Vue services index
Path: /src/_services/index.js
The services index file groups all service exports together so they can be imported in other parts of the app using only the folder path, and enables importing multiple services in a single statement (e.g. import { service1, service2, … } from ‘../_services’).
Vuex account module
Path: /src/_store/account.module.js
Vuex alert module
Path: /src/_store/alert.module.js
The vuex alert module is in charge of the alert section of the centralised state store, it contains actions and mutations for setting a success or error alert message, and for clearing the alert.
In this module each alert action just commits a single mutation so it would be possible to commit the mutations directly from your vue components and get rid of the actions. However I prefer to dispatch actions from everywhere for consistency rather than dispatching actions for some things and committing mutations for others.
export const alert = {
    namespaced: true,
    state: {
        type: null,
        message: null
    },
    actions: {
        success({ commit }, message) {
            commit('success', message);
        },
        error({ commit }, message) {
            commit('error', message);
        },
        clear({ commit }) {
            commit('clear');
        }
    },
    mutations: {
        success(state, message) {
            state.type = 'alert-success';
            state.message = message;
        },
        error(state, message) {
            state.type = 'alert-danger';
            state.message = message;
        },
        clear(state) {
            state.type = null;
            state.message = null;
        }
    }
}
Vuex store folder
Path: /src/_store
Wrap up
If this was your first time working with Vue.js, hopefully this helped you understand how everything comes together in a small application. Just to recap, here are some of the topics that were covered in this tutorial:
Check out
where you can take this existing Vue application, connect it to an Express API, and learn how to secure those API endpoints to protect the data. Thanks for reading!
Recap of the vue.js app
In case you didn’t go through the previous tutorial, here’s a recap of what the requirements were: