Что такое профиль безопасности
Профили безопасности определяют процедуры аутентификации устройств и шифрования передаваемых данных.
Наиболее часто встречаются три режима аутентификации:
- открытый подразумевает свободное подключение клиентов;
- на основе общего ключа — так называемый Pre-Shared Key
PSK, — тот самый пароль, запрашиваемый при подключении к сети; - Extensible Authentication Protocol
EAPиспользует проверку подлинности клиентских устройств с помощью внешних сервисов.
Алгоритмов шифрования больше:
- открытый (отсутствие шифрования, данные передаются в исходном виде);
- скомпрометированный
WEP(а также его усовершенствованные версииCKIPиTKIP); AES/CCMPна основеAES256.
Аббревиатуры WPA и WPA2 как раз определяют алгоритм шифрования: TKIP для первого и AES — для последнего.
В примере будут использоваться PSK, WPA2 и динамические ключи.
Introduction
I live in an university campus. Sometimes my work involves building small computer networks to connect devices together and to the Internet for personal, work and experimental use. I have had many cases where the situation would become awkward:
- There may be no wired connectivity to the upstream campus network, but campus WiFi is accessible.
- Devices I use may not have WiFi radio but have Ethernet (wired) connectivity.
- Devices cannot connect to the Internet because the campus WiFi signal is too weak.
In all of the above cases, you will need network equipment to connect to the campus WiFi and extend the network and/or create a second network where the devices in question will connect. But here’s the catch: the campus WiFi is secured with 802.1X EAP.
Access list
Чтобы включить доступ по правилам Access List, на вкладке Interfaces необходимо открыть свойства беспроводного интерфейса, где на вкладке Wireless, убрать галочку с параметра Default Authenticate.
После снятия галки, переходим в Access List и создаем правило. Оно может быть для каждого клиента свое, или общее на всех.
MAC Address
– MAC адрес устройства, которое будет подключатся к вашему роутеру. Если снять галочку Default Authenticate и выставить тут MAC адрес, то только это устройство сможет подключится к сети. Это и есть ограничение подключения по MAC-адресам в Mikrotik. Для того, что бы другое устройство смогло подключится к вашей точке, нужно внести его MAC в список правил.
Interface
– интерфейс к которому будет производится подключение. Если указать “all” – правило будет применяться ко всем беспроводным интерфейсам вашего устройства.
Signal Strength Range – диапазон уровня сигнала, при котором возможно подключение. Настройка применяется в сетях с бесшовным роумингом между точками. Служит для того, что-бы ваше устройство не держалось за текущую точку доступа до критически слабого уровня сигнала, а перерегистрировалось на новую точку (при одинаковом SSID).
Adaptive noise immunity
Позволяет снижать интерференцию и влияние радиошумов на работу сети. Используйте ap and client mode — хуже не будет.
Assigning ip address to the uplink wireless interface and connecting to the internet
Usually if you are connected to a campus or organization WiFi, the IP address is given out via DHCP. So we want a DHCP client running on the interface that is connected to the upstream WiFi. To do this, go to Winbox or Webfig, click ‘IP’ on the menu bar, then click ‘DHCP Client’. Click ‘Add’.
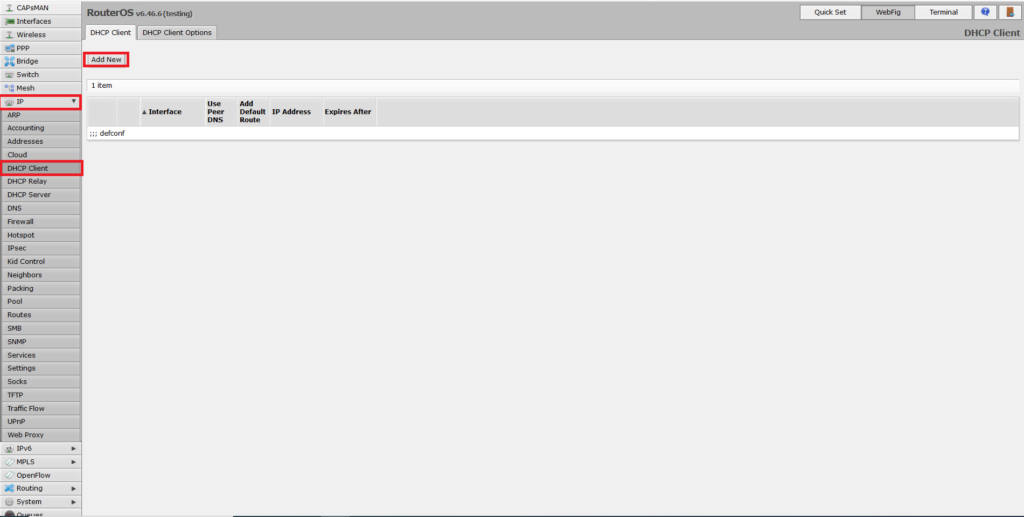
Checkmark ‘Enabled’. Set the interface you are using for the connection (wlan1, wlan2 or wlan1-gateway according to your setup). Set ‘Add Default Route’ to ‘yes’. In ‘DHCP Options‘, click the down arrow to get two dropdown fields. Set the first field to ‘hostname’ and the second to ‘clientid’.
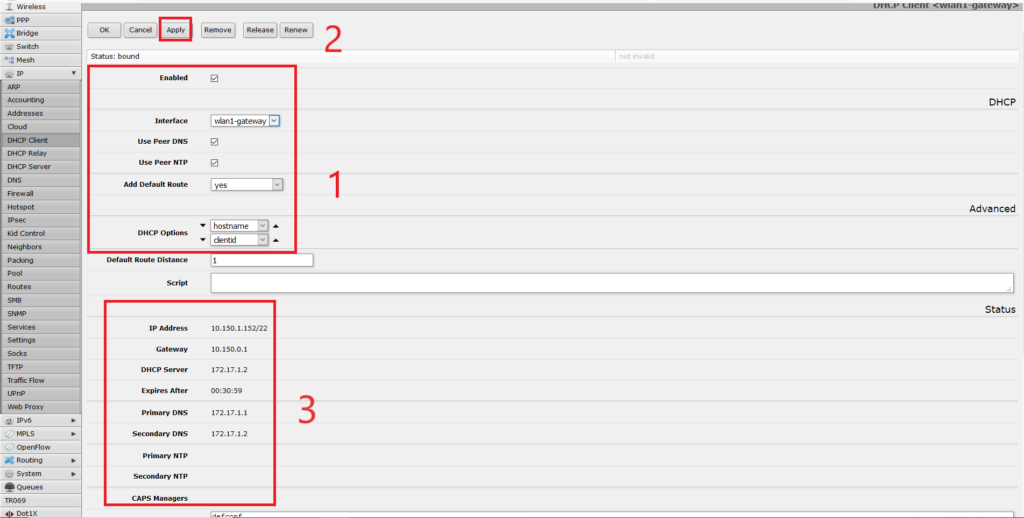
Then click ‘Apply’. In a few seconds, you will see ‘Status: bound’ and the IP address information will show up.
Assuming that you have not modified anything outside this guide, and the local DHCP server is still serving IP addresses in the 192.168.88.0/24 subnet, you will be connected to the campus network in a few more seconds and will be able to browse the web.
Bridge mode
Используйте enabled.
Channel width
Ширина канала влияет на скорость передачи данных, радиус покрытия и интерференцию. При использовании стандарта 2GHz-only-N стоит выбрать значение 20/40 MHz XX, в остальных случаях — оставить 20 MHz.
Индекс определяет направление увеличения емкости канала (C — основной, e — дополнительный). Ce (расширение следующим каналом), eC (расширение предыдущим каналом) и XX (автоматический выбор направления).
Choosing the correct equipment
The first step to ensure stable connectivity is to get the correct equipment for the task at hand. Mikrotik has a lot of products and the complete list is here. You need to choose the correct one to match your needs. If the organization WiFi is available in the same building you are presently in, you can go for any regular home or SOHO access point.
Connecting to upstream wifi
Depending on your hardware, your Mikrotik device will have one or more wireless interfaces. If you have a dual-band home or SOHO AP, you will have one for 2.4 GHz (wlan1) and one for 5 GHz (wlan2), apart from the Ethernet interfaces. If you have an outdoor equipment, it will most likely have one wireless interface for 5 GHz (wlan1-gateway)
and one Ethernet interface (ether1-local). At this point, you need to choose which band you need to connect to the upstream WiFi network. If your device has only a single band, it is a no brainer. If your device is dual-band, the rule of the thumb is to go for 5 GHz for more spectrum width, better throughput and less neighbour interference, and 2.4 GHz in case 5 GHz is weak or non-operational.
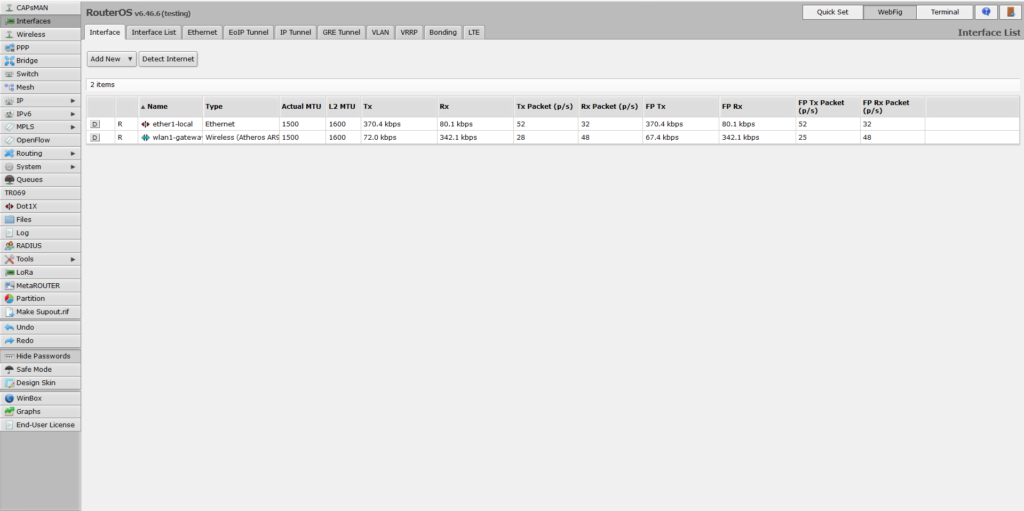
As an example, I am using a SXT 5 ac which is a single band (5 GHz) outdoor wireless device. The wireless interface is wlan1-gateway and I am connected to it from my laptop using an Ethernet cable connected to ether1-local. All screenshots in this article are from the SXT 5 ac outdoor radio, except those mentioned otherwise.
Once logged into Winbox or Webfig, I see this.
Click on the interface you would like to use to connect, and click the ‘Scan’ button and then click ‘Start’ to see if the desired upstream WiFi network is visible. If yes, click ‘Close’ and continue.
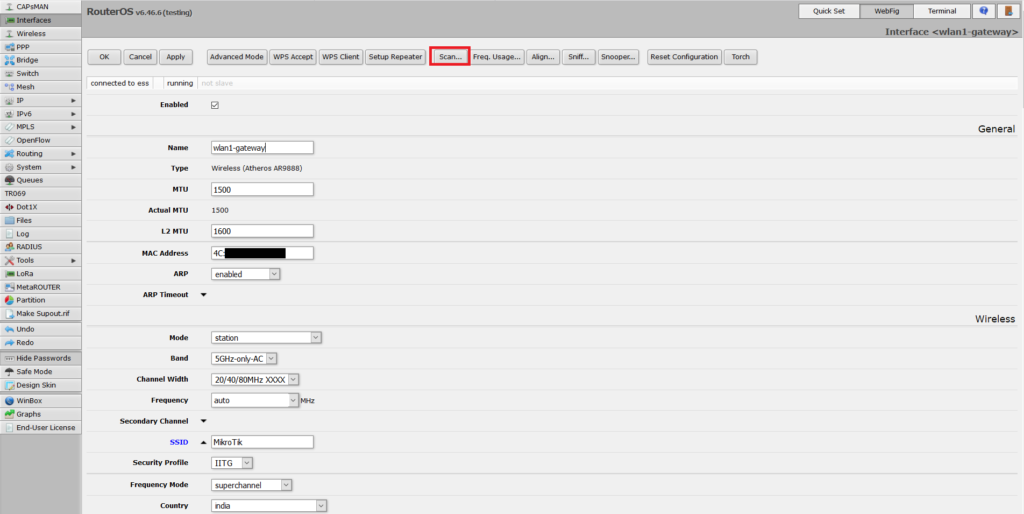
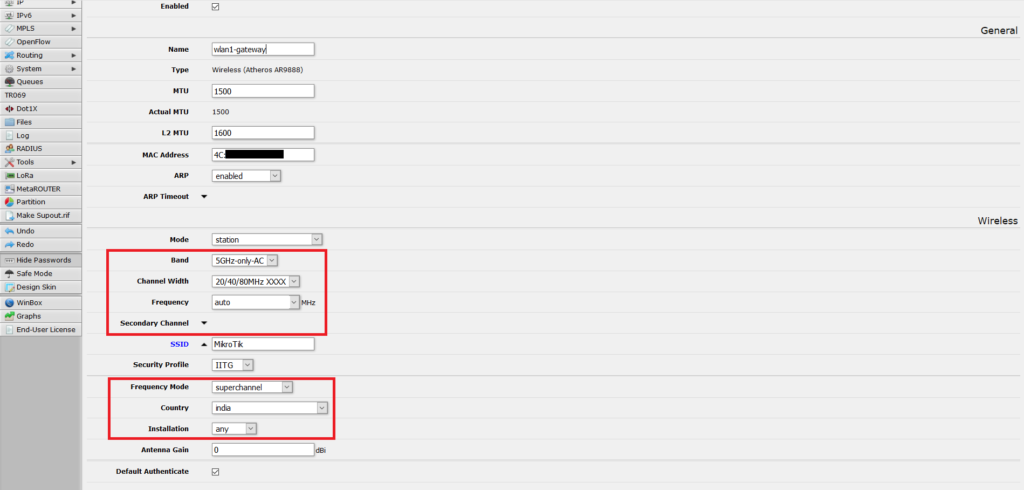
Otherwise, click ‘Close’, adjust the ‘Band’, ‘Channel width’, ‘Frequency Mode’, ‘Country’ and perform the scan again. Keep doing so till the desired network is visible. My recommendation is to set ‘Country’ to the name of the country you reside in, ‘Frequency Mode’ to ‘superchannel’ and installation to ‘any’ and see if it works. Once you are sure that it works, copy the network name, a.k.a., SSID and note it down somewhere.
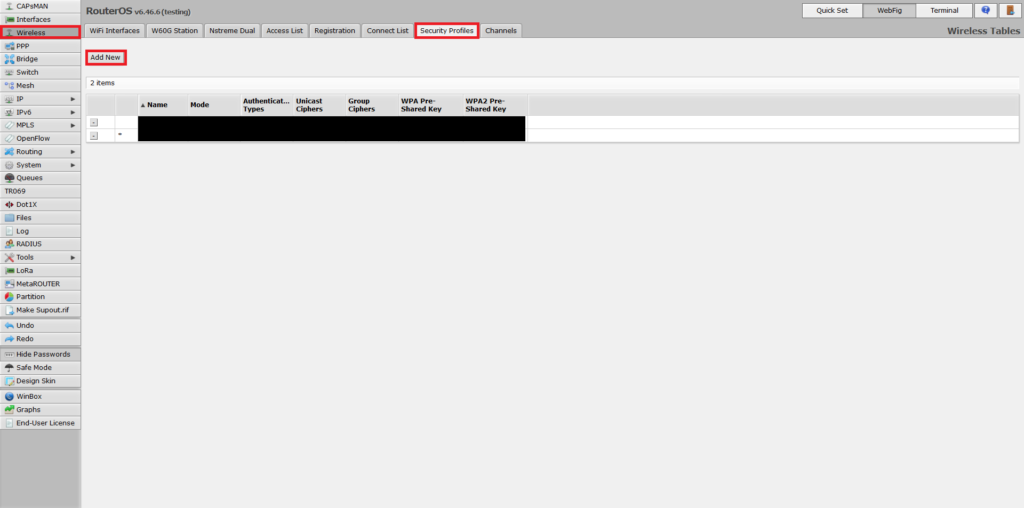
Click the ‘Wireless’ button on the right side menu, then click the ‘Security Profiles’ tab. Click ‘Add new’ button.
Country
Власти ряда стран (например, Франции) законодательно ограничивают возможность использовать полный частотный спектр. (В Японии — наоборот, разрешают лишний канал.) Старайтесь использовать актуальное значение — укажите страну, в которой эксплуатируется оборудование.
Default authenticate
Аутентифицировать клиентов, которых нет в белых списках; активируйте опцию.
Default forward
Разрешить маршрутизацию для клиентов, отсутствующих в белых списках; активируйте опцию.
Distance
Используйте indoors для всего «гражданского» оборудования.
Frequency
Несущая частота — один из немногих параметров, настройка которого может принести пользу. Кнопка Freq. Usage запускает утилиту мониторинга частотного диапазона, изучив картину которого вы сможете выбрать наиболее свободный канал. При отсутствии проблем дайте устройству сделать это самостоятельно — значение auto.
Frequency mode
Дополнительные настройки manual-txpower и superchannelчастотного режима позволят управлять мощностью излучателя. regulatory-domain использует законодательные ограничения выбранной страны (для России это 20 dBm).
Guard interval
Используйте long для N-стандарта; иначе — any.
Multicast buffering и keepalive frames
Главным образом служат для корректной доставки пакетов на мобильные устройства, переходящие в энергосберегающий режим со сниженным использованием доступа к беспроводным сетям. Активируйте оба пункта.
Multicast helper
Для дома, где используется IPTV, укажите full. В иных случаях — default (что равноценно disabled).
Nstreeme
Деактивируйте все опции.
Preparing the interfaces (for indoor mikrotik devices only)
This step is necessary if you are using an indoor home or SOHO equipment like the hAP series. If you have an outdoor equipment that uses the wireless interface as a WAN port, you can simply skip this part.
By default, on home and SOHO gateway equipment, the first Ethernet port (named ether1) is added to the WAN interface list. The remaining Ethernet ports (ether2 to ether5) and the WiFi interfaces (wlan1 and wlan2) are connected to the bridge interface (bridge1) and all of them are on the LAN interface list.
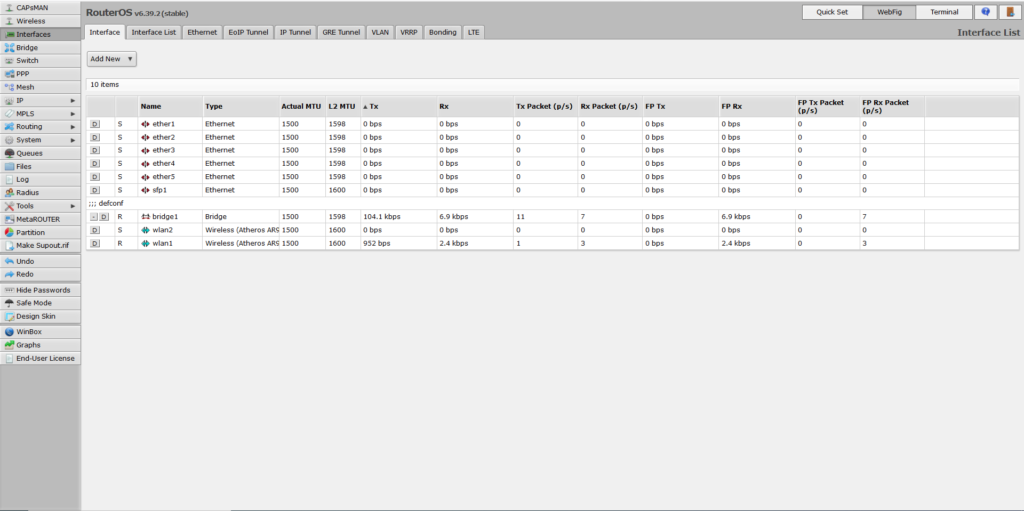
What we need to do is put the WiFi interface that connects to the upstream WiFi network on the WAN list. Then assign ether1 as a port in bridge1. Finally put bridge1 in LAN list. The final configuration should look something like this (screenshot has been taken from my hAP ac).
Reclaiming the band lost to upstream wifi (for indoor mikrotik devices only)
If you have followed the guide so far on an indoor AP-router, you will notice you have lost a whole (2.4 GHz or 5 GHz) band because the radio is being used for the upstream WiFi connection. But what if you have devices you want to connect to your Mikrotik router that are limited to a single band? Or you want to keep dual-band connectivity as advertised by Mikrotik? Well, here is a solution.
RouterOS has a concept of virtual wireless interfaces. Virtual interfaces allow the wireless radio to run in multiple wireless interface modes apart from the default one. People often use this feature for guest networks and separate SSIDs.
In Webfig or Winbox, go to ‘Interfaces’ in main menu. Then click ‘Add New’. Choose ‘Virtual’.

Give a name to the connection. In my example, it is wlan3. Set the ‘Mode’ to ‘AP Bridge’. Set ‘SSID’ to the name of the local WiFi network. Set the ‘Master Interface’ to the interface being used for upstream connection. Set ‘Security Profile’ to ‘default’ (which is the profile used by the local WiFi network). Finally scroll up and click ‘OK’.
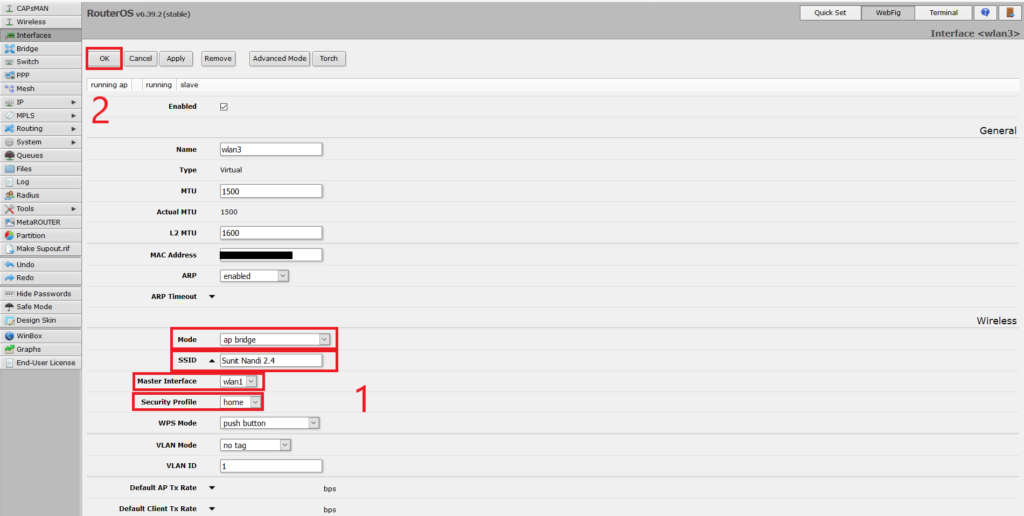
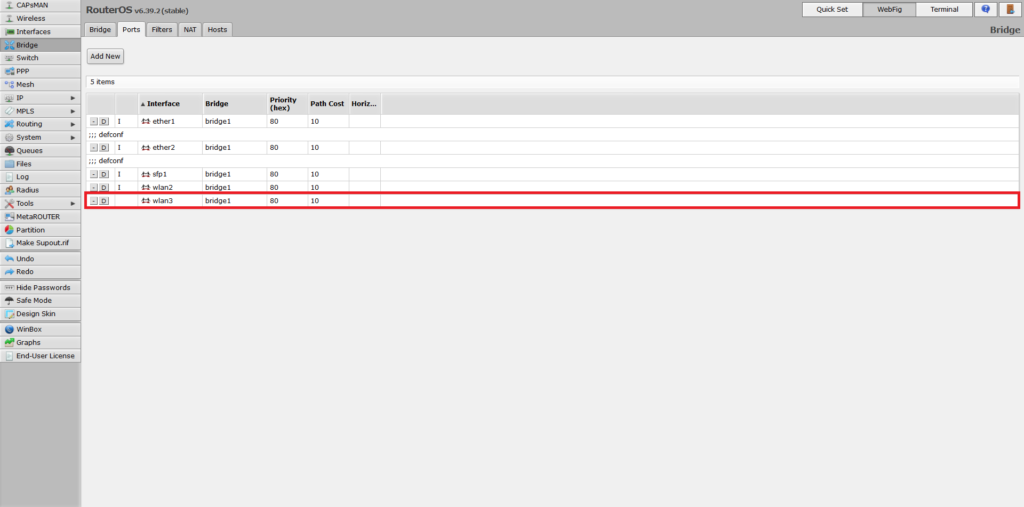
Then add this virtual interface to the bridge interface bridge1.
Security profile
Выберите из списка уже настроенный профиль безопасности — default.
Security profiles
Начнем с самого интересного – Security Profiles. Именно здесь мы настраиваем шифрование для наших беспроводных точек. Настройка будет осуществляться для домашней или офисной точки доступа. Профиль защиты выставляется непосредственно в свойства беспроводного интерфейса.
При переходе на вкладку /interface wireless security-profiles видим такую картину.
Name – имя профиля.
Если используем стандартный профиль – оставляем по-умолчанию.
Mode – режим шифрования.
Для защиты беспроводной сети ВСЕГДА используем режим dynamic-keys.
Аuthentication Types
– набор поддерживаемых типов аутентификации. Клиент сможет подключится к точке доступа только если поддерживает данный тип аутентификации. Предлагаемые варианты: WPA-PSK , WPA2-PSK , WPA-EAP и WPA2-ЕАР. Техническое отличие WPA от WPA2 состоит в технологии шифрования, в частности, в используемых протоколах.
В WPA используется протокол TKIP, в WPA2 – протокол AES. На практике это означает, что более современный WPA2 обеспечивает более высокую степень защиты сети. К примеру, протокол TKIP позволяет создавать ключ аутентификации размером до 128 бит, AES – до 256 бит.
Разница между WPA2-PSK и WPA2-ЕАР состоит в том, откуда берутся ключи шифрования, используемые в механике алгоритма AES. Для частных (домашних, мелких) применений используется статический ключ (пароль, кодовое слово, PSK (Pre-Shared Key)) минимальной длиной 8 символов, которое задается в настройках точки доступа, и у всех клиентов данной беспроводной сети одинаковым.
Компрометация такого ключа (проболтались соседу, уволен сотрудник, украден ноутбук) требует немедленной смены пароля у всех оставшихся пользователей, что реалистично только в случае небольшого их числа. Для корпоративных применений, как следует из названия, используется динамический ключ, индивидуальный для каждого работающего клиента в данный момент.
RADIUS-сервер мы не используем, сотрудники у нас говорливые, но и пароли мы меняем часто, поэтому наш выбор WPA2-PSK. Оставляем галочку только на нем, все другие “небезопасные” протоколы – отключаем.
Unicast Ciphers – выбор типа шифрования. Клиенты смогут подключиться в вашей точке, если поддерживают данный тип шифрования. Поддерживаются два типа tkip и aes-ccm. AES – это современный и более безопасный алгоритм.
Он совместим со стандартом 802.11n и обеспечивает высокую скорость передачи данных. TKIP является устаревшим. Он обладает более низким уровнем безопасности и поддерживает скорость передачи данных вплоть до 54 МБит/сек. Кроме того, стандарт алгоритма ССМ требует использования новых временных ключей для каждой вновь создаваемой сессии, а это плюс к безопасности.
Используем только aes-ccm.
Group Ciphers – выбор типа шифрования. Ваша станция будет пытаться подключиться только к тем точкам доступа, которые поддерживаю данный тип шифрования. Описание ничем не отличается от предыдущего параметра.
Используем только aes-ccm.
WPA-Pre-Shared Key, WPA2 Pre-Shared Key – значение ключа. Для задания пароля используйте цифры, буквы верхнего И нижнего регистра, Специальные символы ( %, *, @, #, $, ~). Не забывайте регулярно менять пароль (например раз в 15 дней).
Используем сложный пароль.
Supplicant Identity
Ssid и radio name
В имени беспроводной сети имеет смысл отразить используемый частотный диапазон; например: Mikrotik 2,4GHz.
Параметр Radio Name можно игнорировать: он используется только взаимодействующими между собой устройствами MikroTik.
Tx power mode
Если хотите снизить мощность передатчика, используйте all rates fixed и явно задайте значение Tx Power. Начинайте, например, с 2 dBm и плавно повышайте значение до обеспечивающего стабильное соединение в радиусе действия. Иначе оставьте default.
Upgrading routeros and resetting to factory defaults
Most Mikrotik devices on the factory installed version of the OS lack support for 802.1X in WiFi client mode. Hence, it is imperative that you upgrade your version of RouterOS to the latest one including all the extra packages. You can do so by going to the RouterOS download page here and grabbing the one that says ‘Extra packages’. There is no need to download ‘Main package’ because ‘Extra packages’ has everything you need.

Once you download the zip archive, extract it to some location on your computer. The connect your computer (PC or laptop) to any of the wired LAN ports and follow the steps in this guide to upgrade to the latest RouterOS version.
A Mikrotik device can be managed via the web interface (also called Webfig) and a Windows app called Winbox. Webfig can be accessed by pointing your browser’s address bar to the IP address of the Mikrotik device. For Winbox, you need to download the app and run it.
Once you are done upgrading, it is recommended to start from a fresh configuration by performing a factory reset. To do so, login to the Mikrotik device using Winbox or Webfig (the web interface), click ‘System’ on the right side pane, then click ‘Reset configuration’ from the drop-down. Finally, leaving all options unchecked, click the ‘Reset Configuration’ button.
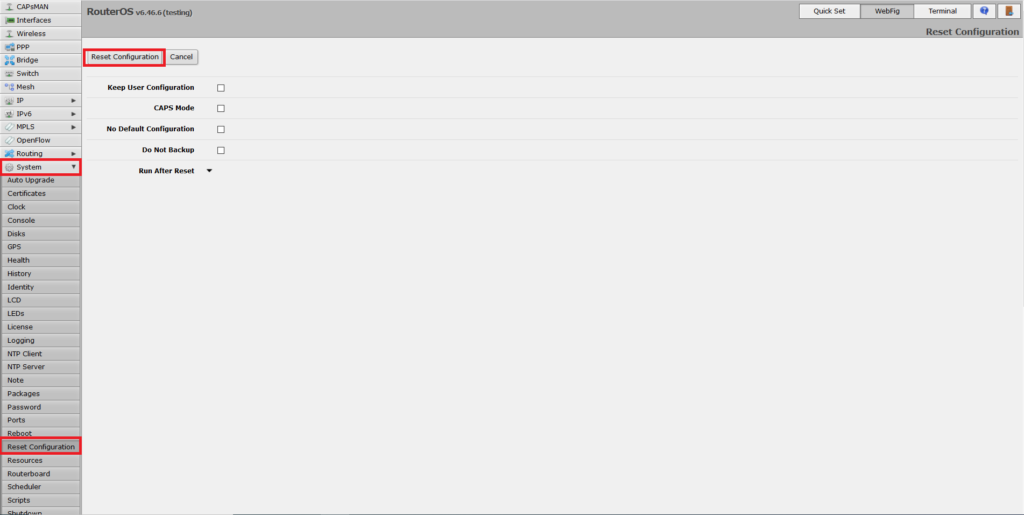
The device will reboot and in 30 seconds it will boot up to factory default configuration. The default IP address of Mikrotik device is 192.168.88.1 and you will be automatically given an IP address in the 192.168.88.0/24 subnet by DHCP. Make sure that you are still connected to the Mikrotik device on the wired LAN ports before moving on to the next steps.
Wireless protocol
Устройства MikroTik поддерживают как общепринятые протоколы беспроводной связи, так и собственные. Проприетарные недоступны для устройств других марок, поэтому используйте 802.11.
Wmm support
Если устройство используется дома, укажите enabled для поддержки Wi-Fi Multimedia; для офиса, кафе или конференц-зала — disabled.
Wps mode
Используйте disabled.
Настройка беспроводных интерфейсов
MikroTik hAP AC оснащен двумя трансиверами: wlan1 отвечает за диапазон 2.4 ГГц, wlan2 — за 5 ГГц. Процесс их конфигурирования практически не отличается, поэтому подробно будет рассмотрена настройка только одного из них.
В разделе Wireless — WiFi Interfaces откройте окно настройки интерфейса wlan1. Переключитесь в расширенный режим, нажав кнопку Advanced Mode.
Настройка моста для обслуживания беспроводных интерфейсов
В разделе Bridge — Ports добавьте два элемента: по одному на каждый беспроводной интерфейс. Мост для обоих — bridge-private.
Настройка профиля безопасности
Wireless — Security Profiles содержит дефолтный профиль, задайте в его настройках наиболее строгие параметры.
Пароль для доступа к будущей беспроводной сети задается атрибутом WPA2 Pre-Shared Key. Используйте значение повышенной сложности; к сетям с этим профилем подключайте только доверенные устройства.
general:
    mode: "dynamic keys"
    authentication_type: "WPA2 PSK"
    unicast_ciphers: "aes ccm"
    group_ciphers: "aes ccm"
    wpa2_pre_shared_key: "password"
set [ find default=yes ] authentication-types=wpa2-psk mode=dynamic-keys wpa2-pre-shared-key=password
Преамбула
Я ожидаю, что читатель знаком с устройствами RouterBOARD, операционной системой RouterOS, владеет инструментами их настройки (SSH или Winbox) или, по крайней мере, изучил предыдущие главы.
Убедитесь, что в разделе Interfaces у вас присутствуют неиспользуемые интерфейсы wlan1 и wlan2.
Final remarks
This article is a guide to quickly extend your personal network connectivity to the WAN and/or Internet using an organization-wide WiFi having 802.1X EAP security.
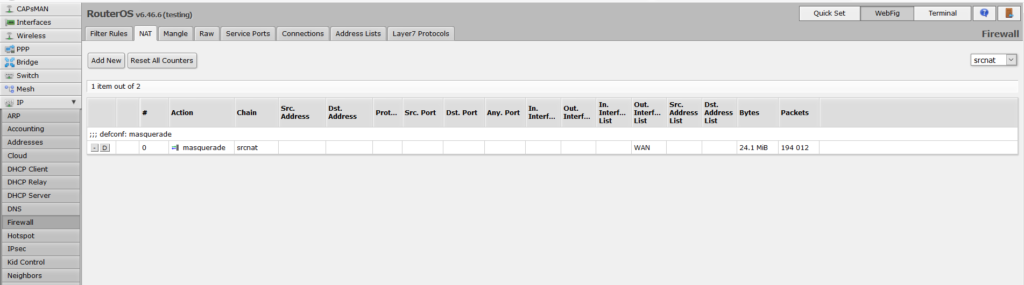
By all means however, this may not be the most optimal setup according to your requirements. Unlike Ethernet and WPA2-PSK based WiFi networks, it is not possible to directly or transparently bridge 802.1X EAP networks without problems. The DHCP server on the organization premises will only provide IP leases to authenticated clients using their MAC address as identifier.
This means that only the Mikrotik router can obtain IP address, while bridged clients connected to the Mikrotik router will not get any IP addresses from upstream. We work around this problem in this guide by using 192.168.88.0/24 (the default) as the local network and routing-plus-NATing to the upstream WiFi link (the NATing takes place automatically on the interfaces in WAN list according to default configuration).
You may also need to tweak other settings, like change default firewall rules, change local network subnet including the DHCP server, or may add a wired WAN as a failover, which is outside the scope of this article. You are advised to study the RouterOS documentation to configure according to your own requirement.
If you are using an outdoor device to connect to a distant WiFi network, then you need another AP to provide indoor wireless connectivity to your personal network: using the Ethernet cable coming from the outdoor device plugged into the WAN port of the indoor AP.
The possibilities are truly endless!