A) checking if someone already logged in?
The very first thing that we need to perform – as soon as the app starts – is to check if someone is already logged in or not?
As the MainActivity will be executed at the very start so we code it in MainActivity.java.
So if someone logged in then redirect them to another activity where their profile will be shown along with an option to sign out, otherwise, let them provide the phone number to sign in.
Android setup
Ensure that all parts of step 1 and 2 from the official firebase Android phone auth docs have been followed.
Authenticate with firebase using a phone number (step by step)
Without any further due, let’s get straight into Coding & development.
D) handling the callbacks
The above method will send the verification code to provide a number, but we need to keep track of this operation and in the end, we also need to verify it.
And for those, check out the last argument mCallbacks. We need to provide an instance of PhoneAuthProvider.OnVerificationStateChangedCallbacks class to handle the callback functions.
We can override the callback methods like onVerificationCompleted, onVerificationFailed and onCodeSent.
Here is how we will be handling the callbacks
Firebase phone authentication android tutorial
package net.simplifiedcoding.firebasephoneauthentication;
importandroid.content.Intent;
importandroid.os.Bundle;
importandroid.support.annotation.NonNull;
importandroid.support.design.widget.Snackbar;
importandroid.support.v7.app.AppCompatActivity;
importandroid.view.View;
importandroid.widget.EditText;
importandroid.widget.Toast;
importcom.google.android.gms.tasks.OnCompleteListener;
importcom.google.android.gms.tasks.Task;
importcom.google.android.gms.tasks.TaskExecutors;
importcom.google.firebase.FirebaseException;
importcom.google.firebase.auth.AuthResult;
importcom.google.firebase.auth.FirebaseAuth;
importcom.google.firebase.auth.FirebaseAuthInvalidCredentialsException;
importcom.google.firebase.auth.PhoneAuthCredential;
importcom.google.firebase.auth.PhoneAuthProvider;
importjava.util.concurrent.TimeUnit;
publicclassVerifyPhoneActivityextendsAppCompatActivity{
//These are the objects needed
//It is the verification id that will be sent to the user
private String mVerificationId;
//The edittext to input the code
private EditText editTextCode;
//firebase auth object
private FirebaseAuth mAuth;
@Override
protected void onCreate(Bundle savedInstanceState){
super.onCreate(savedInstanceState);
setContentView(R.layout.activity_verify_phone);
//initializing objects
mAuth=FirebaseAuth.getInstance();
editTextCode=findViewById(R.id.editTextCode);
//getting mobile number from the previous activity
//and sending the verification code to the number
Intent intent=getIntent();
String mobile=intent.getStringExtra(“mobile”);
sendVerificationCode(mobile);
//if the automatic sms detection did not work, user can also enter the code manually
//so adding a click listener to the button
findViewById(R.id.buttonSignIn).setOnClickListener(new View.OnClickListener(){
@Override
public void onClick(Viewv){
String code=editTextCode.getText().toString().trim();
if(code.isEmpty()||code.length()<6){
editTextCode.setError(“Enter valid code”);
editTextCode.requestFocus();
return;
}
//verifying the code entered manually
verifyVerificationCode(code);
}
});
}
//the method is sending verification code
//the country id is concatenated
//you can take the country id as user input as well
private void sendVerificationCode(String mobile){
PhoneAuthProvider.getInstance().verifyPhoneNumber(
” 91″ mobile,
60,
TimeUnit.SECONDS,
TaskExecutors.MAIN_THREAD,
mCallbacks);
}
//the callback to detect the verification status
private PhoneAuthProvider.OnVerificationStateChangedCallbacks mCallbacks=new PhoneAuthProvider.OnVerificationStateChangedCallbacks(){
@Override
public void onVerificationCompleted(PhoneAuthCredential phoneAuthCredential){
//Getting the code sent by SMS
String code=phoneAuthCredential.getSmsCode();
//sometime the code is not detected automatically
//in this case the code will be null
//so user has to manually enter the code
if(code!=null){
editTextCode.setText(code);
//verifying the code
verifyVerificationCode(code);
}
}
@Override
public void onVerificationFailed(FirebaseExceptione){
Toast.makeText(VerifyPhoneActivity.this,e.getMessage(),Toast.LENGTH_LONG).show();
}
@Override
public void onCodeSent(Strings,PhoneAuthProvider.ForceResendingToken forceResendingToken){
super.onCodeSent(s,forceResendingToken);
//storing the verification id that is sent to the user
mVerificationId=s;
}
};
private void verifyVerificationCode(String code){
//creating the credential
PhoneAuthCredential credential=PhoneAuthProvider.getCredential(mVerificationId,code);
//signing the user
signInWithPhoneAuthCredential(credential);
}
private void signInWithPhoneAuthCredential(PhoneAuthCredential credential){
mAuth.signInWithCredential(credential)
.addOnCompleteListener(VerifyPhoneActivity.this,new OnCompleteListener<AuthResult>(){
@Override
public void onComplete(@NonNullTask<AuthResult>task){
if(task.isSuccessful()){
//verification successful we will start the profile activity
Intent intent=new Intent(VerifyPhoneActivity.this,ProfileActivity.class);
intent.setFlags(Intent.FLAG_ACTIVITY_NEW_TASK|Intent.FLAG_ACTIVITY_CLEAR_TASK);
startActivity(intent);
}else{
//verification unsuccessful.. display an error message
String message=“Somthing is wrong, we will fix it soon…”;
if(task.getException()instanceof FirebaseAuthInvalidCredentialsException){
message=“Invalid code entered…”;
}
Snackbar snackbar=Snackbar.make(findViewById(R.id.parent),message,Snackbar.LENGTH_LONG);
snackbar.setAction(“Dismiss”,new View.OnClickListener(){
@Override
public void onClick(Viewv){
}
});
snackbar.show();
}
}
});
}
}
Step 1 – create a new android studio project
Create a new project by clicking on File -> New -> New Project
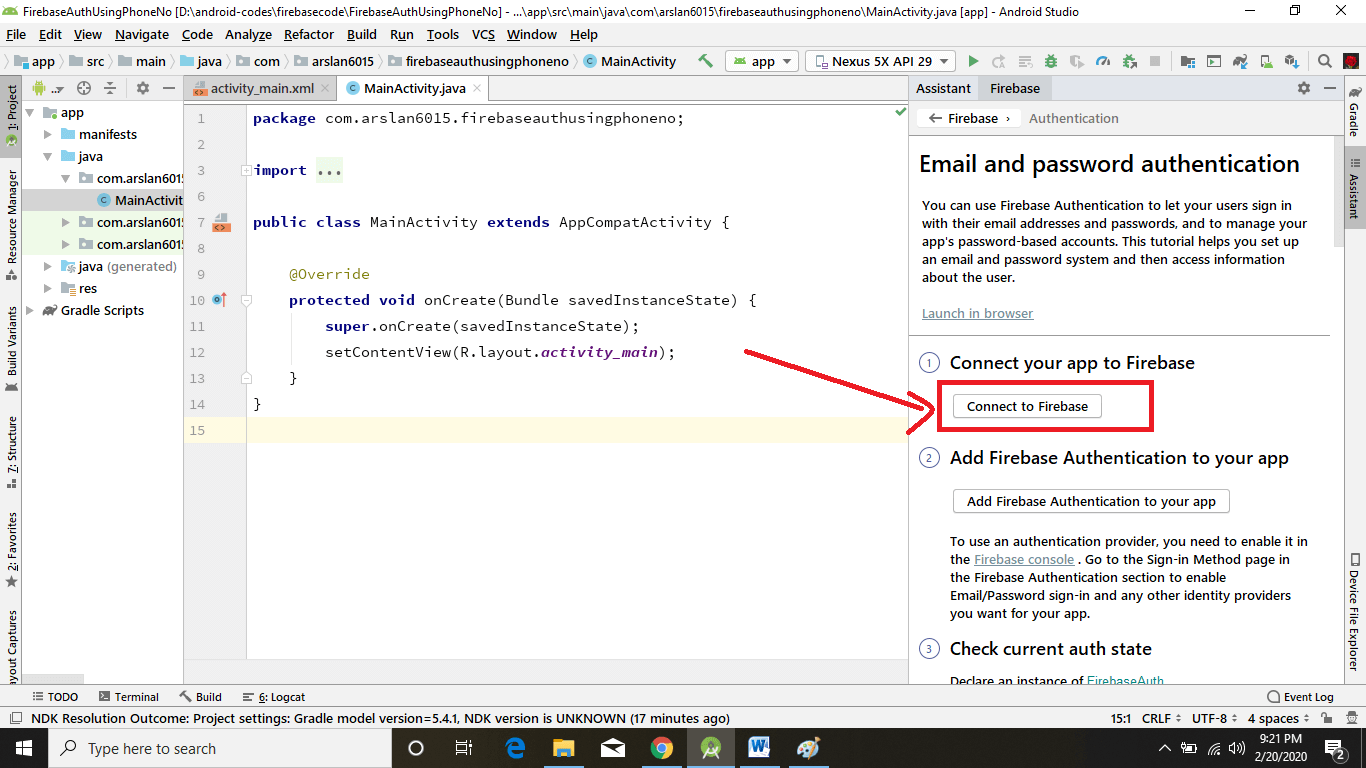
Step 2 – connect your app to firebase
- Once the project is created, you need to add Firebase Auth to your project.
- Click on Tools –> Firebase it will open a new window on the right side in which you can see all the services that are provided by Firebase.
- As we are interested in Firebase Authentication only, so we will go for that. Click on Authentication -> Email and Password Authentication
- Before adding the Firebase Authentication dependencies to our Android app, we need to first connect to Firebase. Click on Connect to Firebase.
If you are not logged into to Android Studio using your Google account then it will ask you to log in, otherwise, it will show you windows to choose an existing Firebase project or create a new one
I am creating a new Firebase Project so I will enter the project name, select Country and click Connect to Firebase.
That’s it, our app is now connected to Firebase.
Step 3 – add firebase authentication to your project
- It’s simple as before, just click the button saying Add Firebase Authentication to your app
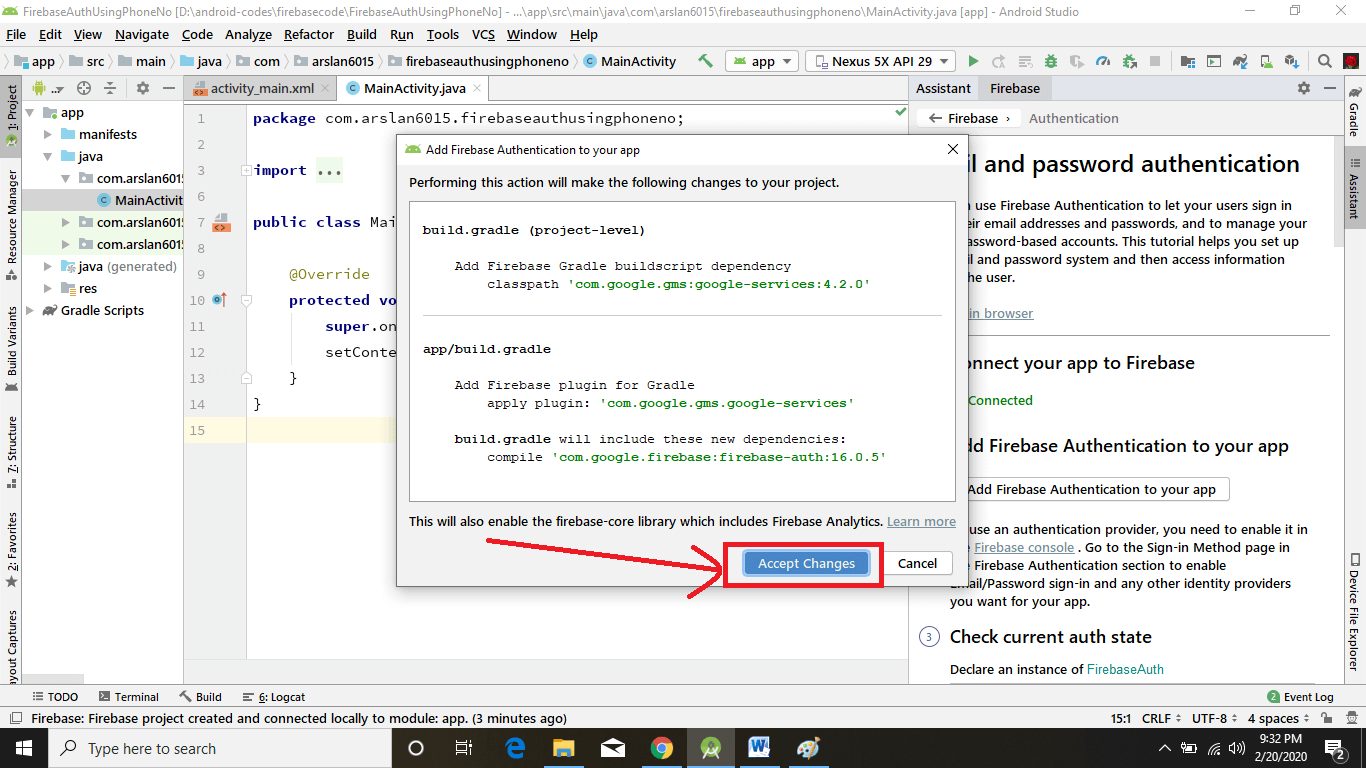
- Click Apply Changes, after some time you can see all the dependencies set up correctly.
Step 5 – coding the application
Here is the coding part.
Step 5: structuring the application
The application contains three activities:
Tip: run-on physical device
Note: This will run only on Physical device. Do not run on the emulator.
If you run on emulator the following error occurs.
Github Source Code
if you are facing any problem then you can download my source code and run the app.
Github Link
Don’t forget to ask a question. I understand many people feel being an idiot in asking a question, please don’t feel hesitation. I’ll be delighted to answer your simplest or hardest question.
C) sending verification code
Once we have the phone number – and of course after performing the small checks like if the phone number is valid, not empty, etc – we need to send a verification code from Firebase.
There is a method named verifyPhoneNumber() that we can call and provide the relevant argument and it will send a verification code to the phone number we provided. Here is how: