Edit Shortcut
Right-click on your new shortcut and click Properties.
Take note of the Target field. It shows the path to putty.exe in Program Files. We are going to add a switch to this.
After the double quotes, paste in the following
-ssh john@192.168.1.10 -pw PaSsWoRd1.1 The host name section
The top box on the Session panel, labelled «Specify your connection by host name», contains the details that need to be filled in before PuTTY can open a session at all.
- The «Host Name» box is where you type the name, or the IP address, of the server you want to connect to.
- The «Connection type» radio buttons let you choose what type of connection you want to make: a raw connection, a Telnet connection, an Rlogin connection, an SSH connection, or a connection to a local serial line. (See section 1.2 for a summary of the differences between SSH, Telnet and rlogin; see section 3.6 for an explanation of «raw» connections; see section 3.7 for information about using a serial line.)
- The «Port» box lets you specify which port number on the server to connect to. If you select Telnet, Rlogin, or SSH, this box will be filled in automatically to the usual value, and you will only need to change it if you have an unusual server. If you select Raw mode, you will almost certainly need to fill in the «Port» box yourself.
If you select «Serial» from the «Connection type» radio buttons, the «Host Name» and «Port» boxes are replaced by «Serial line» and «Speed»; see section 4.29 for more details of these.
1.2 Loading and storing saved sessions
The next part of the Session configuration panel allows you to save your preferred PuTTY options so they will appear automatically the next time you start PuTTY. It also allows you to create saved sessions, which contain a full set of configuration options plus a host name and protocol. A saved session contains all the information PuTTY needs to start exactly the session you want.
- To save your default settings: first set up the settings the way you want them saved. Then come back to the Session panel. Select the «Default Settings» entry in the saved sessions list, with a single click. Then press the «Save» button.
If there is a specific host you want to store the details of how to connect to, you should create a saved session, which will be separate from the Default Settings.
- To save a session: first go through the rest of the configuration box setting up all the options you want. Then come back to the Session panel. Enter a name for the saved session in the «Saved Sessions» input box. (The server name is often a good choice for a saved session name.) Then press the «Save» button. Your saved session name should now appear in the list box.
You can also save settings in mid-session, from the «Change Settings» dialog. Settings changed since the start of the session will be saved with their current values; as well as settings changed through the dialog, this includes changes in window size, window title changes sent by the server, and so on.
- To reload a saved session: single-click to select the session name in the list box, and then press the «Load» button. Your saved settings should all appear in the configuration panel.
- To modify a saved session: first load it as described above. Then make the changes you want. Come back to the Session panel, and press the «Save» button. The new settings will be saved over the top of the old ones.
To save the new settings under a different name, you can enter the new name in the «Saved Sessions» box, or single-click to select a session name in the list box to overwrite that session. To save «Default Settings», you must single-click the name before saving.
- To start a saved session immediately: double-click on the session name in the list box.
- To delete a saved session: single-click to select the session name in the list box, and then press the «Delete» button.
Each saved session is independent of the Default Settings configuration. If you change your preferences and update Default Settings, you must also update every saved session separately.
Saved sessions are stored in the Registry, at the location
11.2 «Shift overrides application’s use of mouse»
PuTTY allows the server to send control codes that let it take over the mouse and use it for purposes other than copy and paste. Applications which use this feature include the text-mode web browser links, the Usenet newsreader trn version 4, and the file manager mc (Midnight Commander).
When running one of these applications, pressing the mouse buttons no longer performs copy and paste. If you do need to copy and paste, you can still do so if you hold down Shift while you do your mouse clicks.
However, it is possible in theory for applications to even detect and make use of Shift mouse clicks. We don’t know of any applications that do this, but in case someone ever writes one, unchecking the «Shift overrides application’s use of mouse» checkbox will cause Shift mouse clicks to go to the server as well (so that mouse-driven copy and paste will be completely disabled).
If you want to prevent the application from taking over the mouse at all, you can do this using the Features control panel; see section 4.6.2.
12.1 Character classes
PuTTY will select a word at a time in the terminal window if you double-click to begin the drag. This section allows you to control precisely what is considered to be a word.
Each character is given a class, which is a small number (typically 0, 1 or 2). PuTTY considers a single word to be any number of adjacent characters in the same class. So by modifying the assignment of characters to classes, you can modify the word-by-word selection behaviour.
In the default configuration, the character classes are:
- Class 0 contains white space and control characters.
- Class 1 contains most punctuation.
- Class 2 contains letters, numbers and a few pieces of punctuation (the double quote, minus sign, period, forward slash and underscore).
So, for example, if you assign the @ symbol into character class 2, you will be able to select an e-mail address with just a double click.
In order to adjust these assignments, you start by selecting a group of characters in the list box. Then enter a class number in the edit box below, and press the «Set» button.
This mechanism currently only covers ASCII characters, because it isn’t feasible to expand the list to cover the whole of Unicode.
Character class definitions can be modified by control sequences sent by the server. This configuration option controls the default state, which will be restored when you reset the terminal (see section 3.1.3.6). However, if you modify this option in mid-session using «Change Settings», it will take effect immediately.
13.7 Adjusting the colours in the terminal window
The main colour control allows you to specify exactly what colours things should be displayed in. To modify one of the PuTTY colours, use the list box to select which colour you want to modify. The RGB values for that colour will appear on the right-hand side of the list box.
Now, if you press the «Modify» button, you will be presented with a colour selector, in which you can choose a new colour to go in place of the old one. (You may also edit the RGB values directly in the edit boxes, if you wish; each value is an integer from 0 to 255.)
PuTTY allows you to set the cursor colour, the default foreground and background, and the precise shades of all the ANSI configurable colours (black, red, green, yellow, blue, magenta, cyan, and white). You can also modify the precise shades used for the bold versions of these colours; these are used to display bold text if you have chosen to indicate that by colour (see section 4.13.4), and can also be used if the server asks specifically to use them.
14.1 Using keepalives to prevent disconnection
If you find your sessions are closing unexpectedly (most often with «Connection reset by peer») after they have been idle for a while, you might want to try using this option.
Some network routers and firewalls need to keep track of all connections through them. Usually, these firewalls will assume a connection is dead if no data is transferred in either direction after a certain time interval. This can cause PuTTY sessions to be unexpectedly closed by the firewall if no traffic is seen in the session for some time.
The keepalive option («Seconds between keepalives») allows you to configure PuTTY to send data through the session at regular intervals, in a way that does not disrupt the actual terminal session. If you find your firewall is cutting idle connections off, you can try entering a non-zero value in this field.
Note that keepalives are not always helpful. They help if you have a firewall which drops your connection after an idle period; but if the network between you and the server suffers from breaks in connectivity then keepalives can actually make things worse.
If a session is idle, and connectivity is temporarily lost between the endpoints, but the connectivity is restored before either side tries to send anything, then there will be no problem — neither endpoint will notice that anything was wrong. However, if one side does send something during the break, it will repeatedly try to re-send, and eventually give up and abandon the connection.
Then when connectivity is restored, the other side will find that the first side doesn’t believe there is an open connection any more. Keepalives can make this sort of problem worse, because they increase the probability that PuTTY will attempt to send data during a break in connectivity.
Therefore, you might find that keepalives help connection loss, or you might find they make it worse, depending on what kind of network problems you have between you and the server.
Keepalives are only supported in Telnet and SSH; the Rlogin and Raw protocols offer no way of implementing them. (For an alternative, see section 4.14.3.)
Note that if you are using SSH-1 and the server has a bug that makes it unable to deal with SSH-1 ignore messages (see section 4.28.11), enabling keepalives will have no effect.
14.5 «Logical name of remote host»
This allows you to tell PuTTY that the host it will really end up connecting to is different from where it thinks it is making a network connection.
You might use this, for instance, if you had set up an SSH port forwarding in one PuTTY session so that connections to some arbitrary port (say, localhost port 10022) were forwarded to a second machine’s SSH port (say, foovax port 22), and then started a second PuTTY connecting to the forwarded port.
In normal usage, the second PuTTY will access the host key cache under the host name and port it actually connected to (i.e. localhost port 10022 in this example). Using the logical host name option, however, you can configure the second PuTTY to cache the host key under the name of the host you know that it’s really going to end up talking to (here foovax).
This can be useful if you expect to connect to the same actual server through many different channels (perhaps because your port forwarding arrangements keep changing): by consistently setting the logical host name, you can arrange that PuTTY will not keep asking you to reconfirm its host key.
Conversely, if you expect to use the same local port number for port forwardings to lots of different servers, you probably didn’t want any particular server’s host key cached under that local port number. (For this latter case, you could instead explicitly configure host keys in the relevant sessions; see section 4.21.2.)
If you just enter a host name for this option, PuTTY will cache the SSH host key under the default SSH port for that host, irrespective of the port you really connected to (since the typical scenario is like the above example: you connect to a silly real port number and your connection ends up forwarded to the normal port-22 SSH server of some other machine).
To override this, you can append a port number to the logical host name, separated by a colon. E.g. entering «foovax:2200» as the logical host name will cause the host key to be cached as if you had connected to port 2200 of foovax.
If you provide a host name using this option, it is also displayed in other locations which contain the remote host name, such as the default window title and the default SSH password prompt. This reflects the fact that this is the host you’re really connecting to, which is more important than the mere means you happen to be using to contact that host. (This applies even if you’re using a protocol other than SSH.)
19.5 Sharing an SSH connection between PuTTY tools
The controls in this box allow you to configure PuTTY to reuse an existing SSH connection, where possible.
The SSH-2 protocol permits you to run multiple data channels over the same SSH connection, so that you can log in just once (and do the expensive encryption setup just once) and then have more than one terminal window open.
Each instance of PuTTY can still run at most one terminal session, but using the controls in this box, you can configure PuTTY to check if another instance of itself has already connected to the target host, and if so, share that instance’s SSH connection instead of starting a separate new one.
To enable this feature, just tick the box «Share SSH connections if possible». Then, whenever you start up a PuTTY session connecting to a particular host, it will try to reuse an existing SSH connection if one is available. For example, selecting «Duplicate Session» from the system menu will launch another session on the same host, and if sharing is enabled then it will reuse the existing SSH connection.
When this mode is in use, the first PuTTY that connected to a given server becomes the «upstream», which means that it is the one managing the real SSH connection. All subsequent PuTTYs which reuse the connection are referred to as «downstreams»: they do not connect to the real server at all, but instead connect to the upstream PuTTY via local inter-process communication methods.
2 The Logging panel
The Logging configuration panel allows you to save log files of your PuTTY sessions, for debugging, analysis or future reference.
The main option is a radio-button set that specifies whether PuTTY will log anything at all. The options are:
- «None». This is the default option; in this mode PuTTY will not create a log file at all.
- «Printable output». In this mode, a log file will be created and written to, but only printable text will be saved into it. The various terminal control codes that are typically sent down an interactive session alongside the printable text will be omitted. This might be a useful mode if you want to read a log file in a text editor and hope to be able to make sense of it.
- «All session output». In this mode, everything sent by the server into your terminal session is logged. If you view the log file in a text editor, therefore, you may well find it full of strange control characters. This is a particularly useful mode if you are experiencing problems with PuTTY’s terminal handling: you can record everything that went to the terminal, so that someone else can replay the session later in slow motion and watch to see what went wrong.
- «SSH packets». In this mode (which is only used by SSH connections), the SSH message packets sent over the encrypted connection are written to the log file (as well as Event Log entries). You might need this to debug a network-level problem, or more likely to send to the PuTTY authors as part of a bug report. BE WARNED that if you log in using a password, the password can appear in the log file; see section 4.2.5 for options that may help to remove sensitive material from the log file before you send it to anyone else.
- «SSH packets and raw data». In this mode, as well as the decrypted packets (as in the previous mode), the raw (encrypted, compressed, etc) packets are also logged. This could be useful to diagnose corruption in transit. (The same caveats as the previous mode apply, of course.)
Note that the non-SSH logging options («Printable output» and «All session output») only work with PuTTY proper; in programs without terminal emulation (such as Plink), they will have no effect, even if enabled via saved settings.
2.1 «Log file name»
In this edit box you enter the name of the file you want to log the session to. The «Browse» button will let you look around your file system to find the right place to put the file; or if you already know exactly where you want it to go, you can just type a pathname into the edit box.
There are a few special features in this box. If you use the & character in the file name box, PuTTY will insert details of the current session in the name of the file it actually opens. The precise replacements it will do are:
&Ywill be replaced by the current year, as four digits.&Mwill be replaced by the current month, as two digits.&Dwill be replaced by the current day of the month, as two digits.&Twill be replaced by the current time, as six digits (HHMMSS) with no punctuation.&Hwill be replaced by the host name you are connecting to.&Pwill be replaced by the port number you are connecting to on the target host.
For example, if you enter the host name c:puttylogslog-&h-&y&m&d-&t.dat, you will end up with files looking like
20.2 Repeat key exchange
If the session key negotiated at connection startup is used too much or for too long, it may become feasible to mount attacks against the SSH connection. Therefore, the SSH-2 protocol specifies that a new key exchange should take place every so often; this can be initiated by either the client or the server.
While this renegotiation is taking place, no data can pass through the SSH connection, so it may appear to «freeze». (The occurrence of repeat key exchange is noted in the Event Log; see section 3.1.3.1.) Usually the same algorithm is used as at the start of the connection, with a similar overhead.
These options control how often PuTTY will initiate a repeat key exchange («rekey»). You can also force a key exchange at any time from the Special Commands menu (see section 3.1.3.2).
- «Max minutes before rekey» specifies the amount of time that is allowed to elapse before a rekey is initiated. If this is set to zero, PuTTY will not rekey due to elapsed time. The SSH-2 protocol specification recommends a timeout of at most 60 minutes.
You might have a need to disable time-based rekeys completely for the same reasons that keepalives aren’t always helpful. If you anticipate suffering a network dropout of several hours in the middle of an SSH connection, but were not actually planning to send data down that connection during those hours, then an attempted rekey in the middle of the dropout will probably cause the connection to be abandoned, whereas if rekeys are disabled then the connection should in principle survive (in the absence of interfering firewalls).
See section 4.14.1 for more discussion of these issues; for these purposes, rekeys have much the same properties as keepalives. (Except that rekeys have cryptographic value in themselves, so you should bear that in mind when deciding whether to turn them off.) Note, however, the the SSH server can still initiate rekeys.
- «Minutes between GSSAPI checks», if you’re using GSSAPI key exchange, specifies how often the GSSAPI credential cache is checked to see whether new tickets are available for delegation, or current ones are near expiration. If forwarding of GSSAPI credentials is enabled, PuTTY will try to rekey as necessary to keep the delegated credentials from expiring. Frequent checks are recommended; rekeying only happens when needed.
- «Max data before rekey» specifies the amount of data (in bytes) that is permitted to flow in either direction before a rekey is initiated. If this is set to zero, PuTTY will not rekey due to transferred data. The SSH-2 protocol specification recommends a limit of at most 1 gigabyte.
As well as specifying a value in bytes, the following shorthand can be used:
- «
1k» specifies 1 kilobyte (1024 bytes). - «
1M» specifies 1 megabyte (1024 kilobytes). - «
1G» specifies 1 gigabyte (1024 megabytes).
- «
Disabling data-based rekeys entirely is a bad idea. The integrity, and to a lesser extent, confidentiality of the SSH-2 protocol depend in part on rekeys occurring before a 32-bit packet sequence number wraps around. Unlike time-based rekeys, data-based rekeys won’t occur when the SSH connection is idle, so they shouldn’t cause the same problems. The SSH-1 protocol, incidentally, has even weaker integrity protection than SSH-2 without rekeys.
21.2 Manually configuring host keys
In some situations, if PuTTY’s automated host key management is not doing what you need, you might need to manually configure PuTTY to accept a specific host key, or one of a specific set of host keys.
One reason why you might want to do this is because the host name PuTTY is connecting to is using round-robin DNS to return one of multiple actual servers, and they all have different host keys. In that situation, you might need to configure PuTTY to accept any of a list of host keys for the possible servers, while still rejecting any key not in that list.
Another reason is if PuTTY’s automated host key management is completely unavailable, e.g. because PuTTY (or Plink or PSFTP, etc) is running in a Windows environment without access to the Registry. In that situation, you will probably want to use the -hostkey command-line option to configure the expected host key(s); see section 3.8.3.20.
For situations where PuTTY’s automated host key management simply picks the wrong host name to store a key under, you may want to consider setting a «logical host name» instead; see section 4.14.5.
To configure manual host keys via the GUI, enter some text describing the host key into the edit box in the «Manually configure host keys for this connection» container, and press the «Add» button. The text will appear in the «Host keys or fingerprints to accept» list box. You can remove keys again with the «Remove» button.
The text describing a host key can be in one of the following formats:
- An MD5-based host key fingerprint of the form displayed in PuTTY’s Event Log and host key dialog boxes, i.e. sixteen 2-digit hex numbers separated by colons.
- A base64-encoded blob describing an SSH-2 public key in OpenSSH’s one-line public key format. How you acquire a public key in this format is server-dependent; on an OpenSSH server it can typically be found in a location like
/etc/ssh/ssh_host_rsa_key.pub.
If this box contains at least one host key or fingerprint when PuTTY makes an SSH connection, then PuTTY’s automated host key management is completely bypassed: the connection will be permitted if and only if the host key presented by the server is one of the keys listed in this box, and the host key store in the Registry will be neither read nor written, unless you explicitly do so.
If the box is empty (as it usually is), then PuTTY’s automated host key management will work as normal.
22 The Cipher panel
PuTTY supports a variety of different encryption algorithms, and allows you to choose which one you prefer to use. You can do this by dragging the algorithms up and down in the list box (or moving them using the Up and Down buttons) to specify a preference order.
PuTTY currently supports the following algorithms:
- ChaCha20-Poly1305, a combined cipher and MAC (SSH-2 only)
- AES (Rijndael) — 256, 192, or 128-bit SDCTR or CBC (SSH-2 only)
- Arcfour (RC4) — 256 or 128-bit stream cipher (SSH-2 only)
- Blowfish — 256-bit SDCTR (SSH-2 only) or 128-bit CBC
- Triple-DES — 168-bit SDCTR (SSH-2 only) or CBC
- Single-DES — 56-bit CBC (see below for SSH-2)
If the algorithm PuTTY finds is below the «warn below here» line, you will see a warning box when you make the connection:
The first cipher supported by the server
is single-DES, which is below the configured
warning threshold.
Do you want to continue with this connection?
This warns you that the first available encryption is not a very secure one. Typically you would put the «warn below here» line between the encryptions you consider secure and the ones you consider substandard. By default, PuTTY supplies a preference order intended to reflect a reasonable preference in terms of security and speed.
In SSH-2, the encryption algorithm is negotiated independently for each direction of the connection, although PuTTY does not support separate configuration of the preference orders. As a result you may get two warnings similar to the one above, possibly with different encryptions.
Single-DES is not recommended in the SSH-2 protocol standards, but one or two server implementations do support it. PuTTY can use single-DES to interoperate with these servers if you enable the «Enable legacy use of single-DES in SSH-2» option; by default this is disabled and PuTTY will stick to recommended ciphers.
26.1 Remote X11 authentication
If you are using X11 forwarding, the virtual X server created on the SSH server machine will be protected by authorisation data. This data is invented, and checked, by PuTTY.
The usual authorisation method used for this is called MIT-MAGIC-COOKIE-1. This is a simple password-style protocol: the X client sends some cookie data to the server, and the server checks that it matches the real cookie. The cookie data is sent over an unencrypted X11 connection; so if you allow a client on a third machine to access the virtual X server, then the cookie will be sent in the clear.
PuTTY offers the alternative protocol XDM-AUTHORIZATION-1. This is a cryptographically authenticated protocol: the data sent by the X client is different every time, and it depends on the IP address and port of the client’s end of the connection and is also stamped with the current time.
PuTTY’s support for XDM-AUTHORIZATION-1 is a somewhat experimental feature, and may encounter several problems:
- Some X clients probably do not even support
XDM-AUTHORIZATION-1, so they will not know what to do with the data PuTTY has provided. - This authentication mechanism will only work in SSH-2. In SSH-1, the SSH server does not tell the client the source address of a forwarded connection in a machine-readable format, so it’s impossible to verify the
XDM-AUTHORIZATION-1data. - You may find this feature causes problems with some SSH servers, which will not clean up
XDM-AUTHORIZATION-1data after a session, so that if you then connect to the same server using a client which only doesMIT-MAGIC-COOKIE-1and are allocated the same remote display number, you might find that out-of-date authentication data is still present on your server and your X connections fail.
PuTTY’s default is MIT-MAGIC-COOKIE-1. If you change it, you should be sure you know what you’re doing.
28 The Bugs and More Bugs panels
Not all SSH servers work properly. Various existing servers have bugs in them, which can make it impossible for a client to talk to them unless it knows about the bug and works around it.
Since most servers announce their software version number at the beginning of the SSH connection, PuTTY will attempt to detect which bugs it can expect to see in the server and automatically enable workarounds. However, sometimes it will make mistakes; if the server has been deliberately configured to conceal its version number, or if the server is a version which PuTTY’s bug database does not know about, then PuTTY will not know what bugs to expect.
The Bugs and More Bugs panels (there are two because we have so many bug compatibility modes) allow you to manually configure the bugs PuTTY expects to see in the server. Each bug can be configured in three states:
- «Off»: PuTTY will assume the server does not have the bug.
- «On»: PuTTY will assume the server does have the bug.
- «Auto»: PuTTY will use the server’s version number announcement to try to guess whether or not the server has the bug.
3.10 Remote-controlled printing
A lot of VT100-compatible terminals support printing under control of the remote server (sometimes called «passthrough printing»). PuTTY supports this feature as well, but it is turned off by default.
To enable remote-controlled printing, choose a printer from the «Printer to send ANSI printer output to» drop-down list box. This should allow you to select from all the printers you have installed drivers for on your computer. Alternatively, you can type the network name of a networked printer (for example, \printserverprinter1) even if you haven’t already installed a driver for it on your own machine.
When the remote server attempts to print some data, PuTTY will send that data to the printer raw — without translating it, attempting to format it, or doing anything else to it. It is up to you to ensure your remote server knows what type of printer it is talking to.
Since PuTTY sends data to the printer raw, it cannot offer options such as portrait versus landscape, print quality, or paper tray selection. All these things would be done by your PC printer driver (which PuTTY bypasses); if you need them done, you will have to find a way to configure your remote server to do them.
To disable remote printing again, choose «None (printing disabled)» from the printer selection list. This is the default state.
4.1 Changing the action of the Backspace key
Some terminals believe that the Backspace key should send the same thing to the server as Control-H (ASCII code 8). Other terminals believe that the Backspace key should send ASCII code 127 (usually known as Control-?) so that it can be distinguished from Control-H. This option allows you to choose which code PuTTY generates when you press Backspace.
If you are connecting over SSH, PuTTY by default tells the server the value of this option (see section 4.25.2), so you may find that the Backspace key does the right thing either way. Similarly, if you are connecting to a Unix system, you will probably find that the Unix stty command lets you configure which the server expects to see, so again you might not need to change which one PuTTY generates. On other systems, the server’s expectation might be fixed and you might have no choice but to configure PuTTY.
If you do have the choice, we recommend configuring PuTTY to generate Control-? and configuring the server to expect it, because that allows applications such as emacs to use Control-H for help.
(Typing Shift-Backspace will cause PuTTY to send whichever code isn’t configured here as the default.)
4.3 Changing the action of the function keys and keypad
This option affects the function keys (F1 to F12) and the top row of the numeric keypad.
- In the default mode, labelled
ESC [n~, the function keys generate sequences likeESC [11~,ESC [12~and so on. This matches the general behaviour of Digital’s terminals. - In Linux mode, F6 to F12 behave just like the default mode, but F1 to F5 generate
ESC [[Athrough toESC [[E. This mimics the Linux virtual console. - In Xterm R6 mode, F5 to F12 behave like the default mode, but F1 to F4 generate
ESC OPthrough toESC OS, which are the sequences produced by the top row of the keypad on Digital’s terminals. - In VT400 mode, all the function keys behave like the default mode, but the actual top row of the numeric keypad generates
ESC OPthrough toESC OS. - In VT100 mode, the function keys generate
ESC OPthrough toESC O[ - In SCO mode, the function keys F1 to F12 generate
ESC [Mthrough toESC [X. Together with shift, they generateESC [Ythrough toESC [j. With control they generateESC [kthrough toESC [v, and with shift and control together they generateESC [wthrough toESC [{.
If you don’t know what any of this means, you probably don’t need to fiddle with it.
6.6 Response to remote window title querying
PuTTY can optionally provide the xterm service of allowing server applications to find out the local window title. This feature is disabled by default, but you can turn it on if you really want it.
NOTE that this feature is a potential security hazard. If a malicious application can write data to your terminal (for example, if you merely cat a file owned by someone else on the server machine), it can change your window title (unless you have disabled this as mentioned in section 4.6.5) and then use this service to have the new window title sent back to the server as if typed at the keyboard.
This allows an attacker to fake keypresses and potentially cause your server-side applications to do things you didn’t want. Therefore this feature is disabled by default, and we recommend you do not set it to «Window title» unless you really know what you are doing.
There are three settings for this option:
- «None»
- PuTTY makes no response whatsoever to the relevant escape sequence. This may upset server-side software that is expecting some sort of response.
- «Empty string»
- PuTTY makes a well-formed response, but leaves it blank. Thus, server-side software that expects a response is kept happy, but an attacker cannot influence the response string. This is probably the setting you want if you have no better ideas.
- «Window title»
- PuTTY responds with the actual window title. This is dangerous for the reasons described above.
Step 1: install putty and generate ssh key pairs
1. The first step you need to take is to go to the official Putty download page, grab the last version of the Putty Windows Installer executable package and install it onto your Windows computer.

2. After you have finished installing Putty go to Windows Start, type putty string to search field, and open PuTTygen program which you will use to generate Keys pairs.

3. Once the program opened, it’s time to proceed with Keys generation. Select SSH-2 RSA Key with 2048 bits, hit the Generate button, and move the cursor randomly on the Putty Key Generator field window as presented in the screenshots below in order to produce SSH Keys.

Аутентификация с помощью ключа
Аутентификация по SSH с помощью ключа гораздо безопаснее парольной аутентификации, т.к. обеспечивает более надёжную проверку подлинности пользователя. При аутентификации используются два ключа: публичный и приватный. Публичный ключ хранится на сервере и представляет собой цифровой «замок», который можно открыть только с помощью ключа, который находится у клиента.
Если кто-либо захочет получить доступ к данным на сервере, ему сначала придётся завладеть цифровым ключом пользователя. Даже если злоумышленник попытается выступить посредником между сервером и клиентом, пользователь получит сообщение о том, что данные хоста были изменены и передача ключа по этому соединению небезопасна.
Следует соблюдать главное правило обеспечения безопасности: секретный ключ действительно должен быть секретным, как со стороны пользователя, так и со стороны сервера. Если кто-то завладеет файлом приватного ключа, то легко сможет получить доступ к серверу.
Приватный ключ дополнительно можно защитить паролем. Это сильно усложнит попытку взлома, т.к. придётся не только завладеть парой уникальных ключей, но и подобрать к ним пароль.
Один приватный ключ пользователь может использовать для подключения сразу к нескольким серверам. В таком случае на ряд серверов устанавливается один и тот же публичный ключ. Таким образом, клиенту нет необходимости использовать разные ключи к разным серверам или запоминать множество паролей, если используется парольный доступ.
Плюсы аутентификации с помощью ключа:
- двусторонняя аутентификация ключевой парой;
- масштабируемость на несколько серверов;
- сложность перехвата ключа и подбора пары;
- возможность дополнительной защиты файла ключа с помощью пароля либо физического носителя.
Минусы ключевой пары:
- ненадлежащая защита файла ключа пользователем не исключает возможности его кражи.
Аутентификация с помощью пароля
SSH использует множество функций обеспечения безопасности передачи данных для любого способа аутентификации пользователя, в т.ч. при использовании пароля. По сети пароль передается в зашифрованном виде. Это усложняет возможность его кражи путем перехвата сетевого трафика.
Пароль не хранится на машине клиента, а использование пустого пароля запрещено по умолчанию. Как правило, сервер предоставляет ограниченное число попыток ввода пароля, что делает неэффективным использование грубой атаки путём подбора с помощью словаря.
Однако зашифрованная передача данных не защищает от слабых паролей. Сложность пароля полностью зависит от пользователя. Слишком простой пароль легко подобрать методами социальной инженерии, а слишком сложный пользователь может забыть. К тому же, парольный доступ не позволяет серверу абсолютно точно идентифицировать клиента. Проверка клиента основана только на правильности ввода пароля.
Плюсы парольного доступа:
- простота использования;
- отсутствие необходимости специальной настройки со стороны клиента и сервера.
Минусы:
- безопасность полностью основана на конфиденциальности и сложности пароля;
- отсутствует возможность точной идентификации клиента;
- пароль легко перехватывается путём установки программы-шпиона со стороны клиента либо с помощью социальной инженерии.
Поскольку использование пароля не может обеспечить абсолютной безопасности клиента, при подключении по SSH надёжнее использовать аутентификацию клиента с помощью ключа.
Вариант первый: генерируем ключи на linux.
Тут все просто, поможет нам утилита ssh-keygen. Неважно где создавать ключи. Но для примера сделаем это на сервере.
Запускаем утлиту ssh-keygen
Программа спросит куда сохранить ключи и предложит задать пароль. Смело нажимаем два раза enter и получем результат.Теперь у нас есть два ключа, которые были сохранены в директорию .ssh: id_rsa — приватный ключ и id_rsa.pub — публичный ключ.Ключи выглядят в виде текста. По этому их можно легко скопировать и вставить в нужный файл.

На сервере выполняем cat id_rsa.pub > authorized_keys — так мы запишем наш ключ в нужный файл
На сторону клиента можно скопировать текст ключа id_rsa. Меняем файлу права chmod -c 0600 id_rsa.
Теперь заходим на удаленный сервер уже без пароля.
Следующий шаг — авторизация на сервер с помощью программы PuTTy
Копируем содержимое ключа id_rsa, вставляем куда-нибудь в блокнотик и сохраняем без расширения.Открываем программу PuTTy Key Generator и загружаем наш ключ кнопкой «Load»
Далее открываем клиент PuTTy. Как обычно в главном окне указываем куда подключаемся, а с левой стороны выбираем «Connection -> Auth», в окошке выбираем наш ключ.
Подключаемся, видим предупреждение и подтверждаем «Yes»
И мы попадаем на сервер без пароля
Импортирование файла openssh в putty
Формат файлов ключей OpenSSH отличается от формата ключей PuTTY. Для того, чтобы ключ, созданный в Unix-системе, успешно использовался под ОС Windows в клиенте PuTTY, его необходимо конвертировать. Для этого нужно запустить генератор ключей PuTTYgen и добавить туда файл ключа.

Выберите файл ключа, сгенерированный в Unix-системе. Программа выдаст сообщение о том, что ключ успешно импортирован.
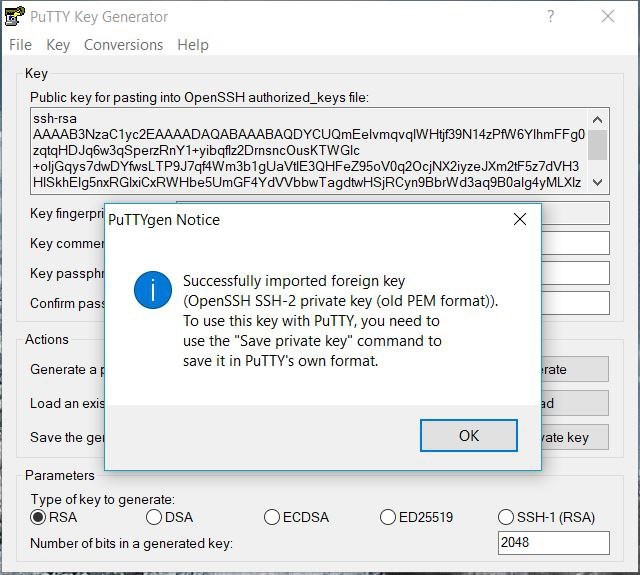
Для сохранения ключа в нужном нам формате необходимо нажать кнопку Save private key. Выберите место хранения ключа и имя файла. Помните, что файл приватного ключа должен быть надёжно защищён от доступа третьих лиц!
Для аутентификации на сервере с помощью PuTTY, нам необходимо добавить наш ключ в базу агента PuTTY (Pageant). Процесс добавления ключа описан выше.
Использование ключевой пары требует первоначальной настройки и генерации ключа, однако упрощает последующий процесс аутентификации и существенно повышает безопасность подключения. Один файл ключа можно использовать для аутентификации на нескольких серверах. В таком случае, один и тот же публичный ключ необходимо добавить на каждый сервер.
25.2 Sending terminal modes
The SSH protocol allows the client to send «terminal modes» for the remote pseudo-terminal. These usually control the server’s expectation of the local terminal’s behaviour.
If your server does not have sensible defaults for these modes, you may find that changing them here helps, although the server is at liberty to ignore your changes. If you don’t understand any of this, it’s safe to leave these settings alone.
(None of these settings will have any effect if no pseudo-terminal is requested or allocated.)
You can change what happens for a particular mode by selecting it in the list, choosing one of the options and specifying the exact value if necessary, and hitting «Set». The effect of the options is as follows:
- If the «Auto» option is selected, the PuTTY tools will decide whether to specify that mode to the server, and if so, will send a sensible value.
PuTTY proper will send modes that it has an opinion on (currently only the code for the Backspace key,
ERASE, and whether the character set is UTF-8,IUTF8). Plink on Unix will propagate appropriate modes from the local terminal, if any. - If «Nothing» is selected, no value for the mode will be specified to the server under any circumstances.
- If a value is specified, it will be sent to the server under all circumstances. The precise syntax of the value box depends on the mode.
By default, all of the available modes are listed as «Auto», which should do the right thing in most circumstances.
The precise effect of each setting, if any, is up to the server. Their names come from POSIX and other Unix systems, and they are most likely to have a useful effect on such systems. (These are the same settings that can usually be changed using the stty command once logged in to such servers.)
Some notable modes are described below; for fuller explanations, see your server documentation.
28.4 «Replies to requests on closed channels»
The SSH protocol as published in RFC 4254 has an ambiguity which arises if one side of a connection tries to close a channel, while the other side simultaneously sends a request within the channel and asks for a reply. RFC 4254 leaves it unclear whether the closing side should reply to the channel request after having announced its intention to close the channel.
Discussion on the ietf-ssh mailing list in April 2022 formed a clear consensus that the right answer is no. However, because of the ambiguity in the specification, some SSH servers have implemented the other policy; for example, OpenSSH used to until it was fixed.
Because PuTTY sends channel requests with the «want reply» flag throughout channels’ lifetime (see section 4.28.3), it’s possible that when connecting to such a server it might receive a reply to a request after it thinks the channel has entirely closed, and terminate with an error along the lines of «Received SSH2_MSG_CHANNEL_FAILURE for nonexistent channel 256».