Installing Our Tools 🛠
First thing’s first, we’ll need to install Bcrypt and JSON Web Tokens!
yarn add bcrypt jsonwebtokenNow you’re ready to get started✨
Creating our JWT Secret 🗝️
We can set up our JWT secret- in our config.ts file, the following was added:
Inserting the token into the header 💯
We are using apollo-link-context’s setContext function to set the headers of our application. We are getting our authorization token from AsyncStorage and then storing it in our header.
About hasura
Based out of Bangalore and San Francisco, Hasura makes developer tools that simplify and accelerate product development.
The Hasura GraphQL engine is an open-source service that gives you instant, realtime, high-performance GraphQL for any Postgres app (including on existing databases).
Read more at Hasura.io.
Adding authentication resolvers
Let’s use the good ol’ numbered comments again to understand what’s going on here – starting with signup.
Angular — имплементация безопасных запросов к graphql api посредством jwt-токенов
Привет Хабр! При реализации Angular проекта, остро встал вопрос о безопасности graphql запросов в Angular 4. Выбор пал на
JSON Web Tokens
. Это открытый стандарт по
RFC 7519
.
Работает JWT по следующей схеме: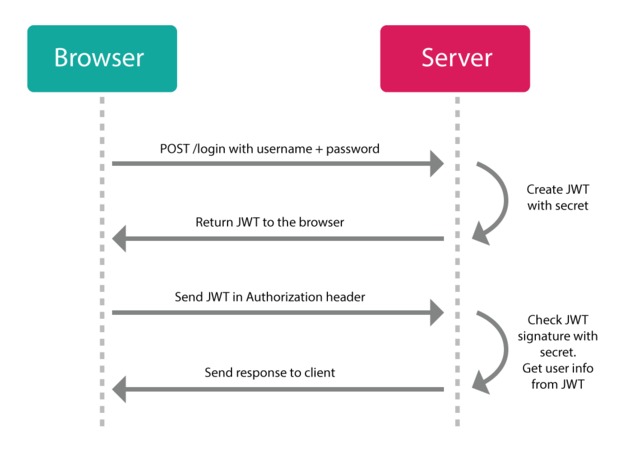
Я начал изучать программирование и Angular относительно недавно, полгода назад, и являюсь наивным чукотским малъчиком. Поэтому любую критику относительно кода и логики, приму как дружеский совет.
Клиентом graphql мы использовали apollo-angular (docs, github), и токены JWT нужны были в хедере каждого запроса к GraphQL API.
Создаем наш сервис авторизации AuthService. Первичное получение токена реализовано через REST:
login(username: string, password: string){ let headers = new Headers({ "content-type": "application/json;charset=utf-8"}); let options = new RequestOptions({ headers: headers }); return this.http.post('http://localhost:8080/login', ({ username: username, password: password }), options) .map((res : any) => { if (res.status === 200) { this.commonToken = res.json(); let data = this.commonToken; this.accessToken = JSON.stringify(data.accessToken); this.refreshToken = JSON.stringify(data.refreshToken); sessionStorage.setItem('accessToken', this.accessToken); sessionStorage.setItem('refreshToken', this.refreshToken); return true; } }) };Получаем accessToken и пишем его в
sessionStorage
браузера.
Здесь стоит сделать отступление и заметить, что sessionStorage живет до закрытия вкладки/браузера, и если пользователь закрыл его, то сбрасывается все содержимое, и как следствие, теряется токен. Альтернатива: localStorage или cookies. В этом случае, токен будет находиться у пользователя до ручного удаления.
Однако тут есть свои подводные камни. Какие именно камни, можно прочитать в этой статье.
Есть еще refreshToken. О нем чуть позже.
Далее, нам необходим клиент, для работы с API. Используем apollo-client:
import ApolloClient, { createNetworkInterface
} from 'apollo-client';
const networkInterface = createNetworkInterface({ uri: 'http://localhost:8080/graphql', opts: { mode: 'cors' }
});
networkInterface.use([ { applyMiddleware(req, next) { if (!req.options.headers) { req.options.headers = {}; } if (sessionStorage.getItem('accessToken')) { req.options.headers['authorization'] = `${JSON.parse(sessionStorage.getItem('accessToken'))}`; } next(); } }
]);
const apolloClient = new ApolloClient({ networkInterface
});
export function provideClient(): ApolloClient { return apolloClient;
}
export class GraphqlClient{}
В этом куске кода, мы берем наш токен из sessionStorage, и пишем его в хедер
authorization
.
У apollo-client есть пара методов для networkInterface:
Middleware и Afterware
. В нашем случае, использовался Middleware, его целью является применение тех или иных параметров, перед отправкой запроса к API.
И еще один немаловажный момент. В параметре opts, указан mode: ‘cors’. Это сделано для Spring Security, на котором крутится мой бэк, в случае если на бекэнде нет cross-origin HTTP request фильтра, мод можно переключить на ‘no-cors’.
Теперь, все запросы или мутации, уходящие посредством apollo-client, будут иметь в хедере наш jwt-токен. На бэкенде, реализована проверка этого токена на валидность и жизнеспособность по времени. Код не мой.
private TokenAuthentication processAuthentication(TokenAuthentication authentication) throws AuthenticationException { String token = authentication.getToken(); DefaultClaims claims; try { claims = (DefaultClaims) Jwts.parser().setSigningKey(DefaultTokenService.KEY).parse(token).getBody(); } catch (UnsupportedJwtException | MalformedJwtException | IllegalArgumentException | SignatureException ex) { throw new AuthenticationServiceException("Invalid JWT token:", ex); } catch (ExpiredJwtException expiredEx) { throw new AuthenticationServiceException("JWT Token expired", expiredEx); } return buildFullTokenAuthentication(authentication, claims); if (claims.get("TOKEN_EXPIRATION_DATE", Long.class) == null) throw new AuthenticationServiceException("Invalid tokens"); Date expiredDate = new Date(claims.get("TOKEN_EXPIRATION_DATE", Long.class)); if (expiredDate.after(new Date())) return buildFullTokenAuthentication(authentication, claims); else throw new AuthenticationServiceException("Token expired date error"); } private TokenAuthentication buildFullTokenAuthentication(TokenAuthentication authentication, DefaultClaims claims) { String username = claims.get("username", String.class); Long userId = Long.valueOf(claims.get("userId", String.class)); String auth = claims.get("authorities", String.class); if(Roles.REFRESH_TOKEN == auth) { throw new AuthenticationServiceException("Refresh token can't be used for authorization!!!"); } List<SimpleGrantedAuthority> authorities = new ArrayList<>(); authorities.add(new SimpleGrantedAuthority(auth)); TokenAuthentication fullTokenAuthentication = new TokenAuthentication(authentication.getToken(), true, authorities, username, userId); return fullTokenAuthentication; }Теперь о refreshToken. Задача refreshToken’a обновить устаревший accessToken.
Реализации могут быть разные, начиная от примитивной проверки в AuthGuard сервисе Angular’a, заканчивая scheduler сервисом, который будет обновлять токен по заданному интервалу времени. В моем случае, был сделан первый вариант. Когда додумаюсь до более умного варианта, реализую. Пока что смог только так.
Итак, создаем метод в нашем сервисе AuthService, который будет вызываться, если наш сервис проверки AuthGuard заметит, что истек срок действия токена:
refresh() { let token = sessionStorage.getItem('accessToken'); let refToken = sessionStorage.getItem('refreshToken'); let headers = new Headers({ "content-type": "application/x-www-form-urlencoded"}); let options = new RequestOptions({headers: headers}); let body = new URLSearchParams(); body.set('RefreshToken', refToken); if (token != null && refToken != null) { return this.http.post('http://localhost:8080/login/refresh', body, options) .subscribe((res : any) => { if (res) { this.commonToken = res.json(); let data = this.commonToken; this.accessToken = JSON.stringify(data.accessToken); sessionStorage.setItem('accessToken', this.accessToken); } }) } else { console.error('An error occurred'); } }Далее, создаем собственно сервис проверки
AuthGuard
:
import { Injectable } from '@angular/core';
import {Router, CanActivate, RouterStateSnapshot, ActivatedRouteSnapshot} from '@angular/router';
import {JwtHelper} from "angular2-jwt";
import {AuthService} from "./auth.service";
@Injectable()
export class AuthGuard implements CanActivate { jwtHelper: JwtHelper = new JwtHelper(); constructor(private authService: AuthService, private router: Router) { } canActivate(route: ActivatedRouteSnapshot, state: RouterStateSnapshot) { let accessToken = sessionStorage.getItem('accessToken'); let refreshToken = sessionStorage.getItem('refreshToken'); if (accessToken && refreshToken) { if (this.jwtHelper.isTokenExpired(accessToken)){ this.authService.refresh() } else { return true } } this.router.navigateByUrl('/unauthorized'); }
}
Здесь используется библиотека
angular2-jwt
и ее метод
isTokenExpired()
. Если метод возвращает true, вызываем созданный ранее метод refresh() и обновляем токен.
Если кому то будет интересно почитать насчет JWT, то вот хороший обзор на английском What is a JSON Web Token?
Рад критике и хорошим советам.
Anonymous tokens
Although not advised, it’s possible to use anonymous tokens. When using an anonymous authenticator, SilverStripe
will generate a default database record in the Members table with the Email anonymous and no permissions by default.
To enable anonymous tokens, add the following to your configuration .yml:
You can then create an anonymous login with the below query.
Note: If the default anonymous authenticator doesn’t suit your purposes, you can inject any other
core SilverStripe authenticator into CustomAuthenticators.
Demo: querying data
Let’s have a look at how authorization with Hasura and JWTs works in practice. A demo has been set up that will allow you to construct queries and see the role-based permissions system in action.
This demo has been pre-configured with a database that has authors, articles, tags, and a relationship table that joins many articles to many tags. Let’s see how we can query for some of this data.
Examples
A Postman collection can be found in the extra folder.
Generating a valid jwt
For the purposes of this demo, a tool has been provided to make it easy for you to generate a JWT and run this mutation.
Implementing the resolver functions
After extending the schema definition with the new operations, you need to implement resolver functions for them. Before doing so, let’s actually refactor your code a bit to keep
it more modular!
You’ll pull out the resolvers for each type into their own files.
Next, move the implementation of the feed resolver into Query.js.
This is pretty straighforward. You’re just reimplementing the same functionality from before with a dedicated function in a different file. The Mutation resolvers are next.
Installation
The default config is available in _configconfig.yml.
In order to securely process and store data via JWT,
you need to set a secret key in your .env file:
A quick way to generate a secure random value value for JWT_SIGNER_KEY is through a PHP CLI command:
You can also use public/private key files.
Note: Relative paths will be relative to your BASE_PATH (prefixed with ./)
Currently, only RSA keys are supported. ECDSA is not supported. The keys in the test-folder are generated by an online RSA key generator.
The signer key for HMAC can be of any length (keys longer than B bytes are first hashed using H). However, less than L bytes is strongly discouraged as it would decrease the security strength of the function.. Thus, for SHA-256 the signer key should be between 16 and 64 bytes in length.
The keys in tests/keys should not be trusted!
License
This module is published under BSD 3-clause license, although these are not in the actual classes, the license does apply:
Log in
To generate a JWT token, send a login request to the createToken mutator:
Prefix
A prefix can be optionally associated with the unique identifier of a JWT record.
This can make it easier to distinguish JWT records created in different contexts,
e.g. on a specific domain or environment type. It is not required for security purposes.
Putting it all together
Awesome! The last thing you need to do now is use the new resolver implementations in index.js.
That’s it, you’re ready to test the authentication flow! 🔓
Requiring authentication for the post mutation
Before you’re going to test your authentication flow, make sure to complete your schema/resolver setup. Right now the post resolver is still missing.
Two things have changed in the implementation compared to the previous implementation in index.js:
Supported services
By default, JWT only supports login. As it’s tokens can not be disabled, nor used for password changes or resets.
The hasura approach
The Hasura platform takes advantage of these technologies to provide a platform for querying and manipulating data in a PostgreSQL database, taking into account the role specified in the authorization token.
Usage
After logging in, you will receive a token which can be used for further requests. This token should be in the header of the request with the Bearer as signature:
Validating query permissions
To view the permissions matrix for the «tag» table:
- Click the «data» tab at the top of the screen
- Click the «tag» table on the left-hand side
- Click the «permissions» tab in the main part of the interface
You will arrive at a matrix that describes all the role permissions for the «tag» table. On this screen we can see a number of things:
What is graphql? an overview
GraphQL is essentially a query language that allows you to define your API in terms of types. It is datastore-agnostic and has server-side support for many different platforms and languages. Instead of defining your API in terms of status codes and semantic URLs, you define the types and then construct queries using a familiar but powerful syntax. As an example:
{ article { id, title, author { name }}}This describes a query for articles, returning the id, title, and the author’s name. As you can see, it supports nested database objects (the author is another table in the schema, linked to from an article). Mutations can also be defined, which describe how to change data.
In addition, multiple queries can be made in a single request, which is most useful when a client wants to retrieve lots of possibly unrelated data points from the server.
Wrapping up
In this post, you learned a bit about GraphQL and the main differences from a traditional REST API. You also had an introduction to JSON Web Tokens, how they are made up, and how easy they are to pass around.
Next, you discovered how Hasura tackles the idea of a role-based architecture when it comes to securing GraphQL APIs, and how it uses JWTs to authorize incoming requests and grant permissions to specific areas of the schema, even down to the field level.
Finally, you had a practical look at the Hasura platform, learning how to perform anonymous queries, and how to perform authorized mutations using a JWT that was issued to you by Auth0.