Аутентификация на основе токенов
Аутентификация на основе токенов в последние годы стала очень популярна из-за распространения одностраничных приложений, веб-API и интернета вещей. Чаще всего в качестве токенов используются Json Web Tokens (JWT). Хотя реализации бывают разные, но токены JWT превратились в стандарт де-факто.
При аутентификации на основе токенов состояния не отслеживаются. Мы не будем хранить информацию о пользователе на сервере или в сессии и даже не будем хранить JWT, использованные для клиентов.
Процедура аутентификации на основе токенов:
(1) -> authorization request
As the first step, we need to build the authorization link that is used to request the desired permissions. To do this, we need to append specified query parameters to the URL:
(10) <- access and refresh tokens
After receiving new tokens, we can save them in the storage, so refreshTokens looks as follows:
(11) -> request with new token
At this step, the request to the protected resource contains a new token and should work fine.
(12) <— protected resource
Given that the 401 response returns JSON data with error details, we need to update our sample to receive the information about a error as a ErrorInfo object:
(2) <- authorization grant (code)
At this step, we copy the authorization code from the browser, paste it in a console, and save it in a variable:
val authorizationCode = readln()
(3) -> authorization grant (code)
Now we are ready to exchange the authorization code for tokens. To do this, we need to create a client and install the ContentNegotiation plugin with the json serializer. This serializer is required to deserialize tokens received from the Google OAuth token endpoint.
(4) <- access and refresh tokens
When tokens are received, we can save them in a storage. In our example, a storage is a mutable list of BearerTokens instances. This means that we can pass its elements to the loadTokens and refreshTokens callbacks.
val bearerTokenStorage = mutableListOf<BearerTokens>()
bearerTokenStorage.add(BearerTokens(tokenInfo.accessToken, tokenInfo.refreshToken!!))
(7) -> request with expired token
At some point, the client makes a request as in Step 5 but with the expired access token.
(8) <- 401 unauthorized response
The resource server returns the 401 unauthorized response, so the client should invoke the refreshTokens callback.
(9) -> authorization grant (refresh token)
To obtain a new access token, we need to configure refreshTokens and make another request to the token endpoint. This time, we use the refresh_token grant type instead of authorization_code:
Disadvantage of bearer tokens
The downside to Bearer tokens is that there is nothing preventing other apps from using a Bearer token if it can get access to it. This is a common criticism of OAuth 2.0, although most providers only use Bearer tokens anyway. Under normal circumstances, when applications properly protect the access tokens under their control, this is not a problem, although technically it is less secure.
I. create and setup a new asp.net core web api
- First, create your ASP.NET Core Web API. To do that just follow the steps below.
2. Now we need to install required packages for this project. I have listed it all below.
- Dapper
- Microsoft.EntityFrameworkCore.SqlServer.Design
- Microsoft.AspNetCore.Authentication.JwtBearer
- Swashbuckle.AspNetCore
- Swashbuckle.AspNetCore.Swagger
- Swashbuckle.Core
- System.IdentityModel.Tokens.Jwt
Use NuGet Package Manager to install this package. If this is your first time using this, you can visit this article.
Ii. setup appsettings.json
After installing all the necessary packages that we need, add your SQL connection string and JWT Auth key inside appsettings.json.
Iii. register jwt base authentication
First, we need to configure JWT based authentication in our project. To do that, register JWT authentication on your startup.cs. Put the code snippet below under ConfigureServices.
services.AddAuthentication(JwtBearerDefaults.AuthenticationScheme) .AddJwtBearer(options => { options.TokenValidationParameters = new TokenValidationParameters { ValidateIssuer = true, ValidateAudience = true, ValidateLifetime = true, ValidateIssuerSigningKey = true, ValidIssuer = Configuration["JwtAuth:Issuer"], ValidAudience = Configuration["JwtAuth:Issuer"], IssuerSigningKey = new SymmetricSecurityKey(Encoding.UTF8.GetBytes(Configuration["JwtAuth:Key"])) }; });- ValidateIssuer = true » Validate the server that generates the token.
- ValidateAudience = true » Validate the recipient of the token is authorized to receive.
- ValidateLifetime = true » Check if the token is not expired and the signing key of the issuer is valid
- ValidateIssuerSigningKey = true » Validate signature of the token
- ValidIssuer » stored in appsettings.json
- ValidAudience » stored in appsettings.json
- IssuerSigningKey » stored in appsettings.json
Iv. create model properties
Let’s create model properties for this project. We will use this model later to handle request parameters and response in our web API. See the code snippet below.
LoginModel
This model will handle the parameter request for our API login method.
Oauth authorization flow
The OAuth authorization flow for our application looks as follows:
(1) —> [[[Authorization request|#step1]]] Resource owner
(2) <— [[[Authorization grant (code)|#step2]]] Resource owner
(3) —> [[[Authorization grant (code)|#step3]]] Authorization server
(4) <— [[[Access and refresh tokens|#step4]]] Authorization server
(5) —>
[[[Request with valid token|#step5]]] Resource server
(6) <— [[[Protected resource|#step6]]] Resource server
⌛⌛⌛ Token expired
(7) —> [[[Request with expired token|#step7]]] Resource server
(8) <
— [[[401 Unauthorized response|#step8]]] Resource server
(9) —> [[[Authorization grant (refresh token)|#step9]]] Authorization server
(10) <— [[[Access and refresh tokens|#step10]]] Authorization server
(11) —>
Let’s investigate how each step is implemented and how the Bearer authentication provider helps us access the API.
Obtain client credentials
As the first step, we need to obtain client credentials required for accessing Google APIs:
Create a Google account.
Open the Google Cloud Console and create the
OAuth client IDcredentials with theAndroidapplication type. This client ID will be used to obtain an authorization grant.
Vi. create repository class
The repository class will handle the authentication and CRUD functionality of our WEB API. This repository class will inherit from an interface class. To create this class, follow the steps below.
- Create a Repository Folder from your project’s root directory.
- Create New Interface and name it IJWTAuthManager. See the code snippet below.
What is <t>?
T is called a type parameter, which can be used as a type of fields, properties, method parameters, return types, and delegates in the DataStore class. For example, Data is generic property because we have used a type parameter T as its type instead of the specific data type.
What is bearer token?
Bearer Tokens are the predominant type of access token used with OAuth 2.0. A Bearer Token is an opaque string, not intended to have any meaning to clients using it. Some servers will issue tokens that are a short string of hexadecimal characters, while others may use structured tokens such as JSON Web Token.
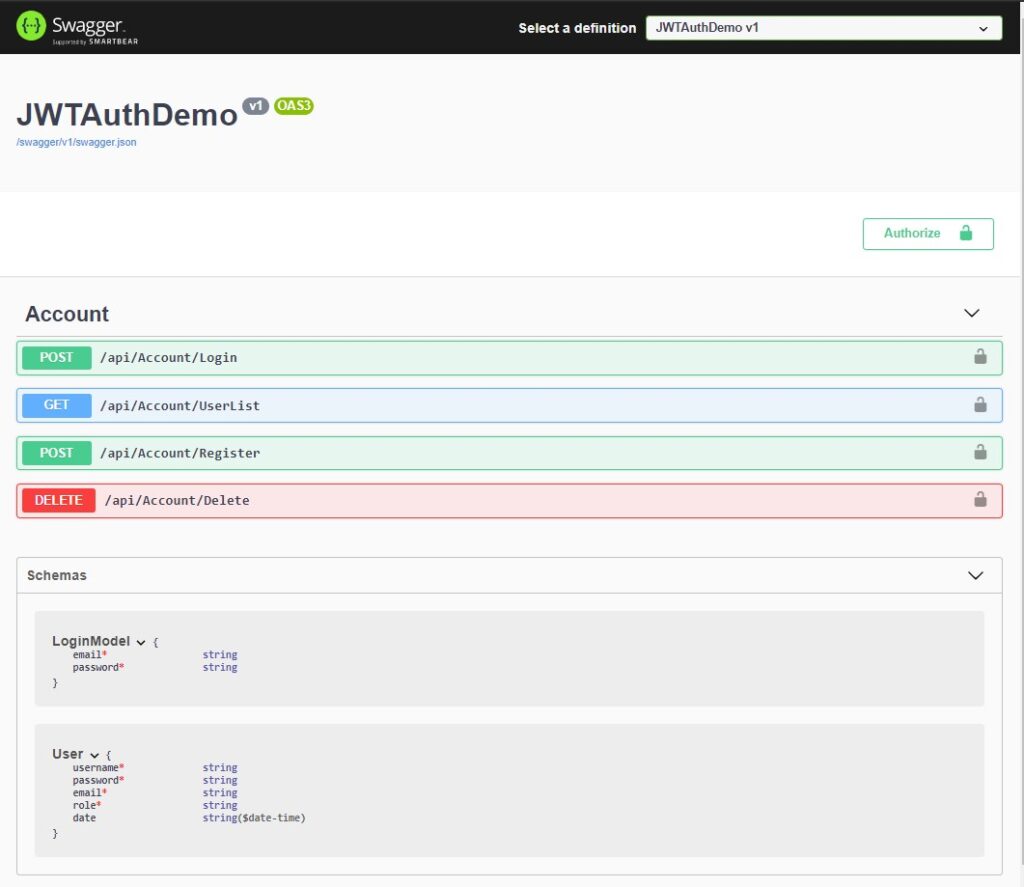
What is swagger?
Swagger is an open-source set of rules, specifications, and tools for developing and describing RESTful APIs. The Swagger framework allows developers to create interactive, machine, and human-readable API documentation. Below is the swagger UI with our default methods and properties or this tutorial.
Before we start please make sure you have the following installed on your machine.
- The latest version of Visual Studio
- Alternatively, you can also use the Visual Studio Code.
- SQL Server
In this tutorial, I am going to use Visual Studio 2022. Below is the video from my previous article on how to implement JWT Auth in ASP.NET Core.
What is the oauth 2.0 bearer token exactly?
As I read your question, I have tried without success to search on the Internet how Bearer tokens are encrypted or signed. I guess bearer tokens are not hashed (maybe partially, but not completely) because in that case, it will not be possible to decrypt it and retrieve users properties from it.
But your question seems to be trying to find answers on Bearer token functionality:
Suppose I am implementing an authorization provider, can I supply any
kind of string for the bearer token? Can it be a random string? Does
it has to be a base64 encoding of some attributes? Should it be
hashed?
So, I’ll try to explain how Bearer tokens and Refresh tokens work:
When user requests to the server for a token sending user and password through SSL, the server returns two things: an Access token and a Refresh token.
An Access token is a Bearer token that you will have to add in all request headers to be authenticated as a concrete user.
Authorization: Bearer <access_token>An Access token is an encrypted string with all User properties, Claims and Roles that you wish. (You can check that the size of a token increases if you add more roles or claims).
Once the Resource Server receives an access token, it will be able to decrypt it and read these user properties. This way, the user will be validated and granted along with all the application.
Access tokens have a short expiration (ie. 30 minutes).
If access tokens had a long expiration it would be a problem, because theoretically there is no possibility to revoke it. So imagine a user with a role=»Admin» that changes to «User». If a user keeps the old token with role=»Admin» he will be able to access till the token expiration with Admin rights.
That’s why access tokens have a short expiration.
But, one issue comes in mind. If an access token has short expiration, we have to send every short period the user and password. Is this secure? No, it isn’t. We should avoid it. That’s when Refresh tokens appear to solve this problem.
Refresh tokens are stored in DB and will have long expiration (example: 1 month).
A user can get a new Access token (when it expires, every 30 minutes for example) using a refresh token, that the user had received in the first request for a token.
When an access token expires, the client must send a refresh token. If this refresh token exists in DB, the server will return to the client a new access token and another refresh token (and will replace the old refresh token by the new one).
In case a user Access token has been compromised, the refresh token of that user must be deleted from DB. This way the token will be valid only till the access token expires because when the hacker tries to get a new access token sending the refresh token, this action will be denied.
What is the use of bearer token?
Bearer Token A security token with the property that any party in possession of the token (a “bearer”) can use the token in any way that any other party in possession of it can. Using a bearer token does not require a bearer to prove possession of cryptographic key material (proof-of-possession).
Аутентификация в соцсетях
Уверен, эта картинка знакома всем:
Аутентификация или авторизация?
Некоторые путают термины «аутентификация» и «авторизация». Это разные вещи.
Ещё тут?
Поздравляю, вы успешно дочитали длинную, нудную и скучную статью.
Беспарольная аутентификация
Первой реакцией на термин «беспарольная аутентификация» может быть «Как аутентифицировать кого-то без пароля? Разве такое возможно?»
В наши головы внедрено убеждение, что пароли — абсолютный источник защиты наших аккаунтов. Но если изучить вопрос глубже, то выяснится, что беспарольная аутентификация может быть не просто безопасной, но и безопаснее традиционного входа по имени и паролю. Возможно, вы даже слышали мнение, что пароли устарели.
Беспарольная аутентификация — это способ конфигурирования процедуры входа и аутентификации пользователей без ввода паролей. Идея такая:
Вместо ввода почты/имени и пароля пользователи вводят только свою почту. Ваше приложение отправляет на этот адрес одноразовую ссылку, пользователь по ней кликает и автоматически входит на ваш сайт / в приложение. При беспарольной аутентификации приложение считает, что в ваш ящик пришло письмо со ссылкой, если вы написали свой, а не чужой адрес.
Есть похожий метод, при котором вместо одноразовой ссылки по SMS отправляется код или одноразовый пароль. Но тогда придётся объединить ваше приложение с SMS-сервисом вроде twilio (и сервис не бесплатен). Код или одноразовый пароль тоже можно отправлять по почте.
И ещё один, менее (пока) популярный (и доступный только на устройствах Apple) метод беспарольной аутентификации: использовать Touch ID для аутентификации по отпечаткам пальцев. Подробнее о технологии.
Если вы пользуетесь Slack, то уже могли столкнуться с беспарольной аутентификацией.
Двухфакторная аутентификация (2fa)
Двухфакторная аутентификация (2FA) улучшает безопасность доступа за счёт использования двух методов (также называемых факторами) проверки личности пользователя. Это разновидность многофакторной аутентификации. Наверное, вам не приходило в голову, но в банкоматах вы проходите двухфакторную аутентификацию: на вашей банковской карте должна быть записана правильная информация, и в дополнение к этому вы вводите PIN.
Если кто-то украдёт вашу карту, то без кода он не сможет ею воспользоваться. (Не факт! — Примеч. пер.) То есть в системе двухфакторной аутентификации пользователь получает доступ только после того, как предоставит несколько отдельных частей информации.